The Joy of Mirror Making: Parabolizing
by Mel Bartels

The goal of parabolizing is to produce a mirror that brings light to a sharp focus. As the light comes to focus it forms a diffraction pattern called the Airy disk. We want our mirror's Airy disk to closely match the theoretical Airy disk.
To do so, our mirror must meet the following two criteria:
Meeting these conditions calls for the mirror's surface to be accurate to about two-millionths of an inch, or one-twentieth of a micron (0.05 microns or 50 nanometers). The mirror's surface is carefully polished to achieve the required accuracy. Because we deal with 'figures of revolution' such as spheroids and paraboloids, we call this 'figuring'.
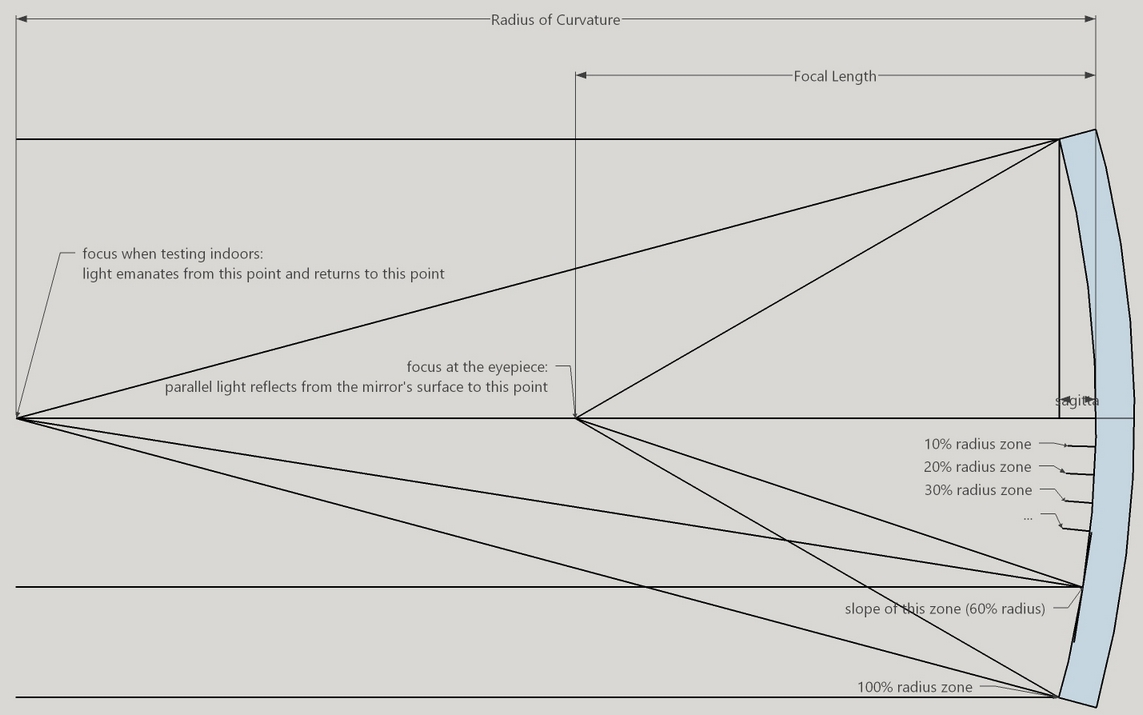
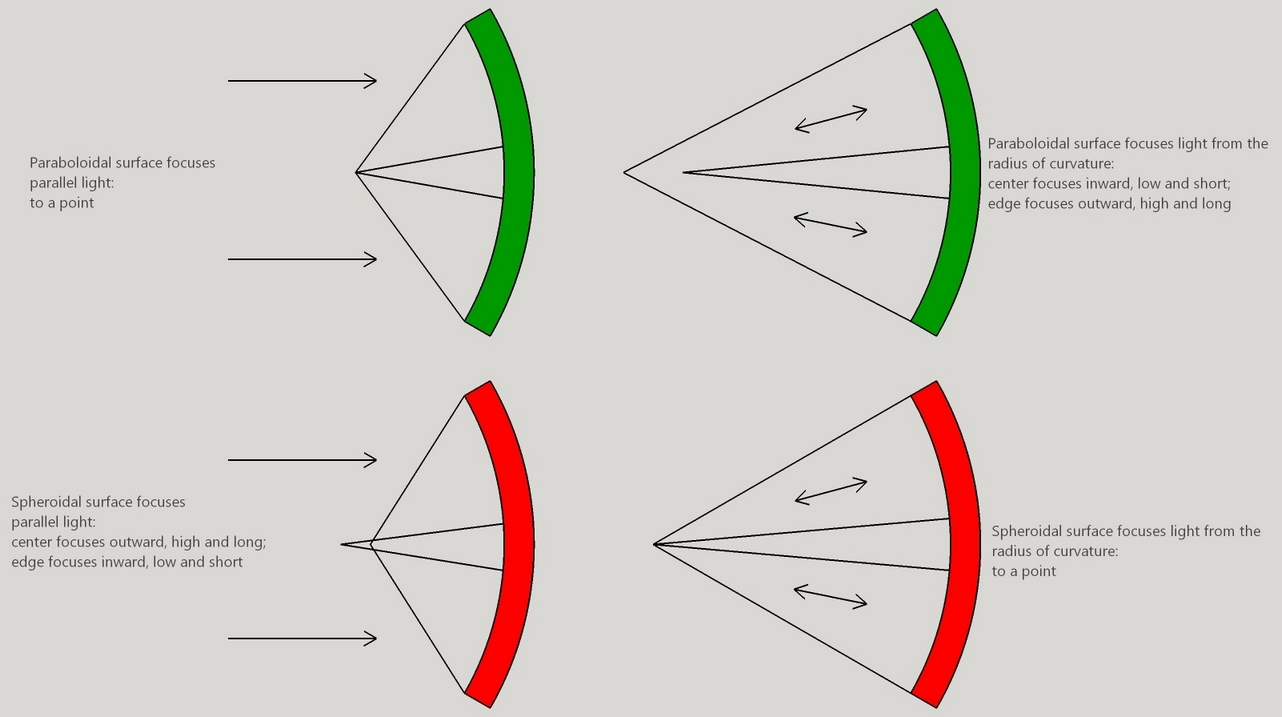
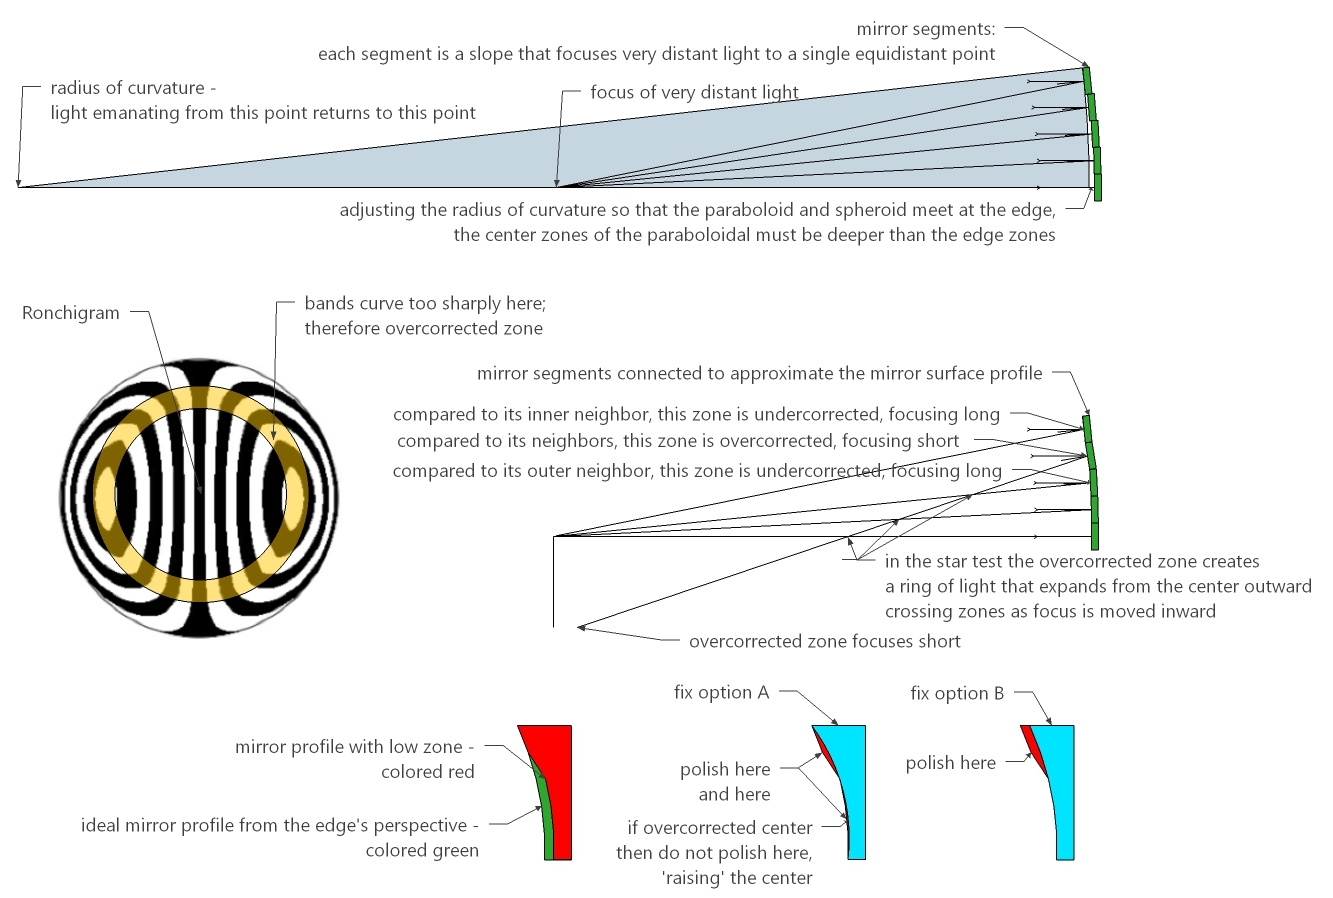
A paraboloidal mirror focuses parallel light from extremely distant objects to an Airy disk. The distance from the mirror to the focal point is the mirror's focal length. A spherical mirror focuses light emanating from a point at the mirror's radius of curvature back onto the point. The radius of curvature is exactly twice the focal length. It is far more convenient to test indoors at the radius of curvature than outside at night, waiting for clear skies.
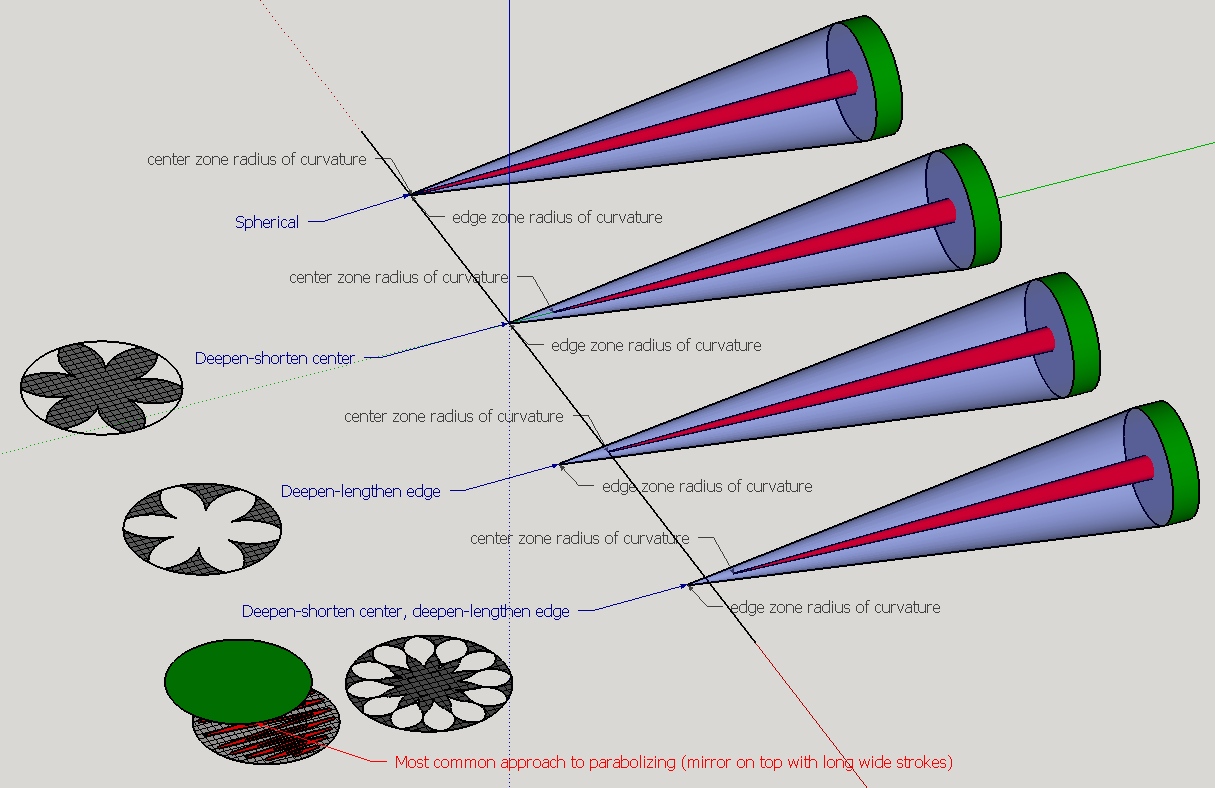
To move from a spherical surface to a paraboloidal surface means that we need to shorten the focus of the mirror's center, or lengthen the focus of the mirror's edge, or a combination of both.
In each of the three cases, the sphere and the parabola have different touch points.
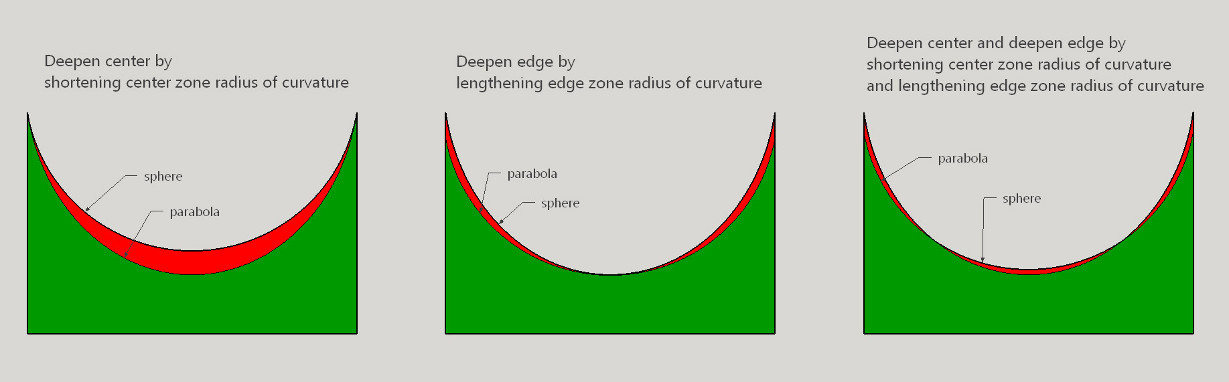
And if the spherical mirror's surface is straightened into a horizontal line, the parabola difference is the gray colored volume:

Think of focusing a spherical mirror. You can focus on the:
Each calls for its own parabolizing strategy.
The principal defect of a spherical mirror when used in a telescope is called 'spherical aberration'. Parabolizing a mirror means removing spherical aberration. Parabolizing is an intensely satisfying intellectual endeavor, requiring some physical skill with a great deal of patience and discipline. It is you, the tool maker, at your finest. Ellison said that brain surgery is easier. With simple test equipment, the mirror maker can resolve and remove errors in the mirror's surface to a millionth of an inch [0.025 microns], creating a surface so large, smooth and precise that the light of astronomical objects from across the universe can be seen.
'O telescope, instrument of knowledge, more precious than any sceptre.' - Johannes Kepler
'I have tried to improve telescopes and practiced continually to see with them. These instruments have play'd me so many tricks that I have at last found them out in many of their humours.' - Sir William Herschel
'Brain surgery is a breeze in comparison.' - Myron Emerson
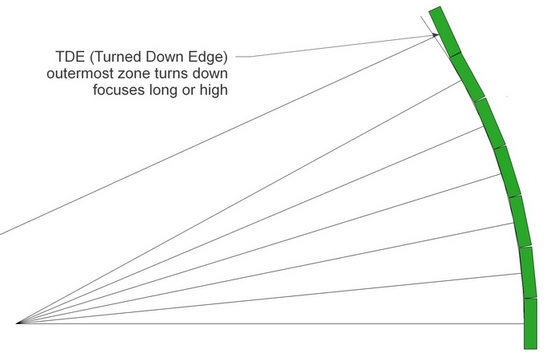
Small mirrors with long focal ratios suffer from little spherical aberration. For example a 4 inch [10cm] F10 mirror focuses nicely with only the slightest hint of spherical aberration. But a 10 inch [25cm] F4 will be a disaster. If you attempt to focus the central portion of the mirror then the edge zones throws light way out in a giant disc. If you attempt the focus the edge portion of the mirror then the center zone throws light way out in a giant disc. This is very ugly and will give you an appreciation of the importance of parabolizing particularly if the mirror is large or fast.
Here is a graphic, greatly enlarged, illustrating the mirror zones' different foci. Pictured is a 10 inch [25cm] F4 mirror where the difference between central zone focus and edge zone focus is 1/6 inch [4mm].
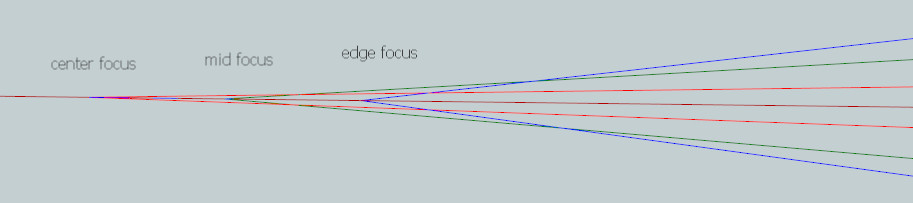
If the mirror's curve is deepened from a sphere to a parabola then the light focuses perfectly, limited only by diffraction. The amount of glass to be removed is a few millionths of an inch. The formula is r^4/(8R^3) (r=mirror radius, R=radius of curvature). For a 6 inch F8, it is one hundred thousandths of an inch or about 1/2 wavelength of light. Want to know how much glass to remove?
It is important to know the difference between longitudinal and transverse aberration. For example, tests like the Foucault measure longitudinal aberration and tests like the Ronchi measure transverse aberration.
![]()
On the test bench at the radius of curvature, light from the mirror's center and edge cross at different locations along the mirror's axis. The mirror can be divided into zones such as the edge zone or the center zone. I often divide the mirror into zones expressed as percentages measured from the mirror's center to the mirror's edge where the 0% zone is the center and the 100% zone is the edge.
As measured from where the mirror's center rays cross the mirror's axis, each zone should cross at a point r^2/2R, where little r is the zone's radius and big R is the Radius of Curvature (this is for a moving light source, for a fixed light source double the values).
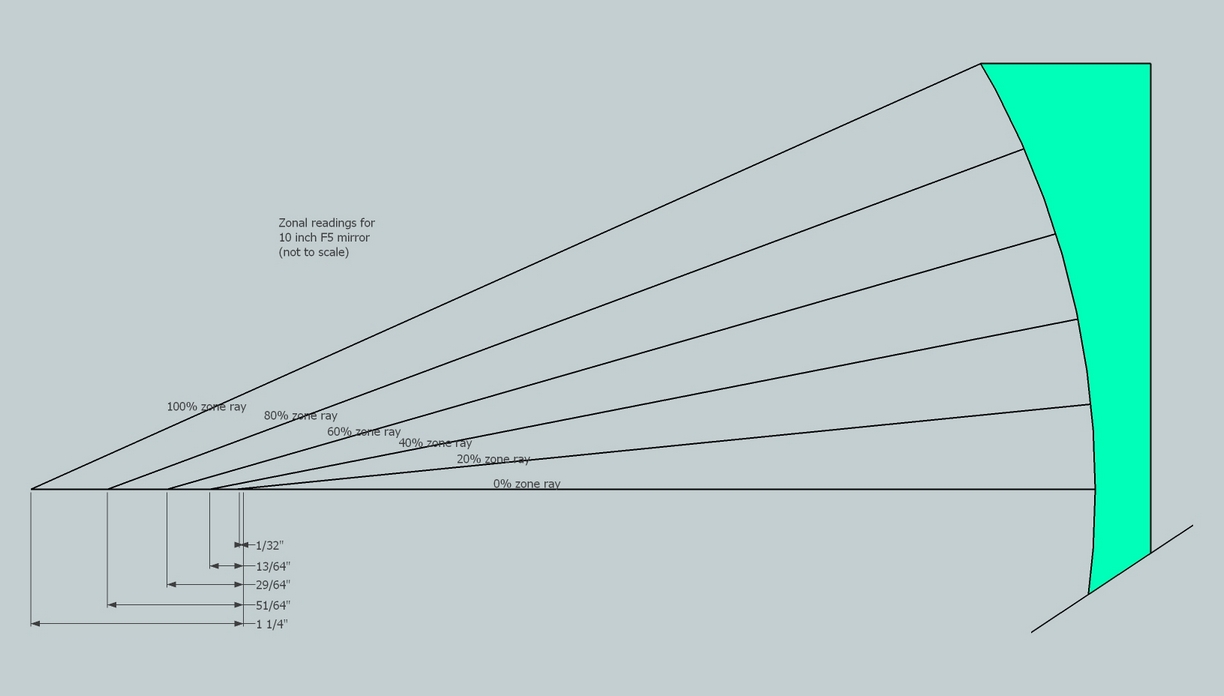
Consider the 10 inch [25cm] F5 as pictured. The parabolic deviation is 3.6 waves of green light. The zonal reading difference between the center and edge is 0.125 inches [3.2mm]. That is a magnification factor of 13,000 - an astounding situation that we take advantage of in our mirror tests! If we can read the zone's crossing point to 0.01 inches [0.25mm] then we could figure the mirror to 1/35 of a wavelength of light.
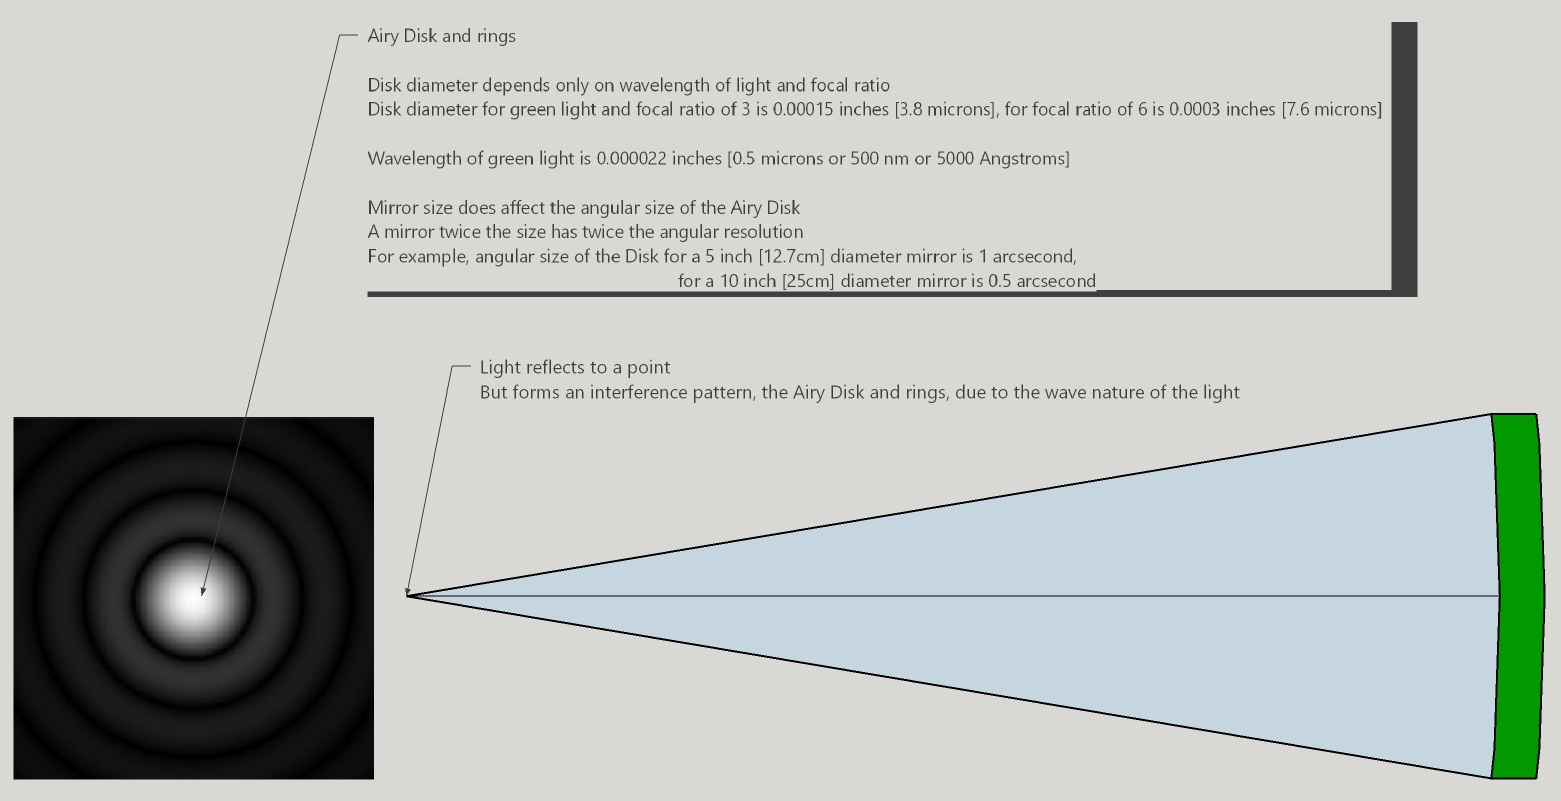
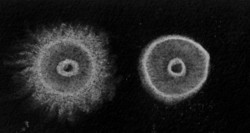
Thanks to diffraction caused by the round shape of our mirror, perfectly focused light forms an Airy disk surrounded by rings of ever fainter brightness. A poor quality mirror causes the surrounding rings to be too bright, ruining resolution. We can see the disk and rings by drastically stopping down the aperture of a telescope to a couple of inches [5cm].
The task of turning a spherical mirror into a parabola mirror is divided into a number of steps, called sessions. This because the amount of glass to remove is many times the required accuracy. For example, a 10 inch [25cm] F5 mirror calls for deepening the center by 0.000078 inches [0.002mm] with the required accuracy 0.000002 inches [0.0005mm], a ratio of about 40:1. A 20 inch [51cm] F2.9 mirror's center needs to be deepened by 0.008 inches [0.02mm], a ratio of 400:1. To remove this much glass to this accuracy in a single session without any testing until the session is done is not doable.
Another way to look at is to consider how many waves of light the mirror needs to remove in going from spherical to parabolic. A 10 inch [25cm] F5 changes by 3.6 waves of green light either by lowering the center or by lowering the edge. Parabolizing by lowering both center and edge removes 1.8 waves of glass. A 22 inch [56cm] F3.0 calls for as much glass to be removed while parabolizing by deepening the center as is removed during polishing from 10 micron aluminum oxide. Use my Newtonian Designer to calculate more of these values including how fast to spin a platter so that the liquid forms a paraboloidal surface.
Each session then calls for a cycle of:
At the end of parabolizing we also conduct a retrospective, where we note the good, the bad and the ugly. This to improve as mirror makers.
There are quite a few parabolizing strategies. I'll go through most of them including some little known ones.
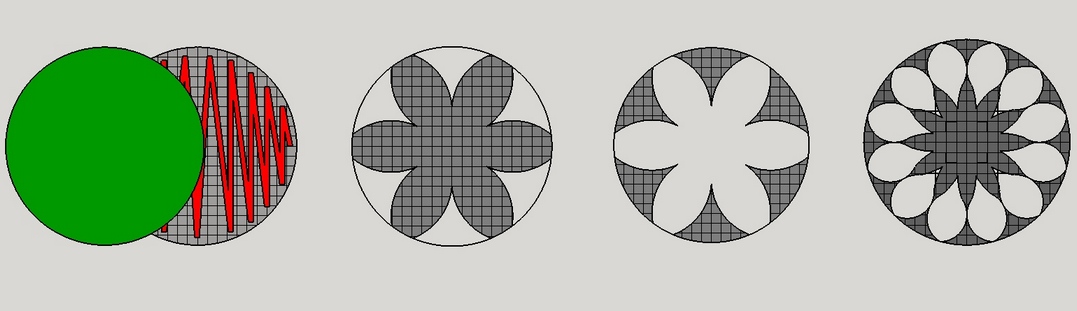
During parabolization, we have the luxury of increasing or shrinking the radius of curvature of the mirror's zones to float or change. Here's a graphic to illustrate.
The mild parabolizing lap shown above may not prove adequate to the challenge of very large extremely fast mirrors. Here is an extreme star lap being used to deepen the center of a 25.1 inch [638cm] F2.62 mirror that calls for 62 waves of correction.

One idea that I have not tried yet but came to me as I was deepening the center of a large fast mirror by mirror on top of sub-diameter lap is this: mirror on top always, start with full sized lap, then gradually reduce the size of the lap by depressing the next outermost zone down to preclude contact with the mirror. This ought to preferentially polish towards the mirror's center. Here's Rob Brown's progressively smaller lap as he parabolized a 16 inch [41cm] F3:
To form the shapes use paper cut to shape pressed between the mirror and lap for a few minutes. The lap can be warmed by soaking in hot water or by a heat gun.
It can be quite confusing at times to contemplate that all these approaches parabolize a mirror, after all the second and third laps are perfect inverses of each other, and the fourth approach is a hybrid of the second and third laps. But never forget that when testing from the radius of curvature, the mirror's center zone must always focus short and the mirror's edge zone must always focus long.
A 16 inch [41cm] pitch lap for a F2.9 mirror.
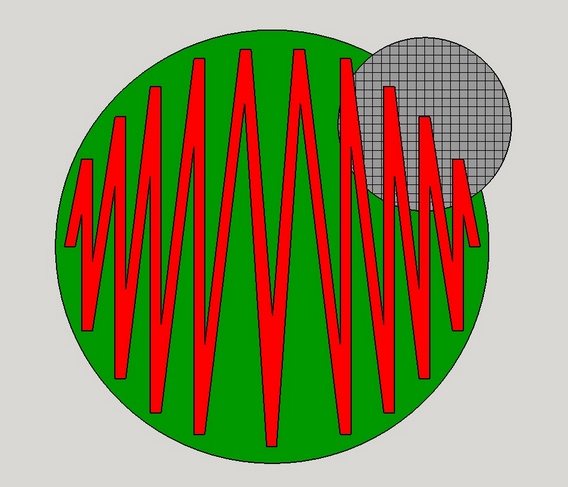
Here is what extreme chordal strokes looks like (10.5 inch [27cm] F2.7 mirror on an 11 inch [28cm] pitch lap).
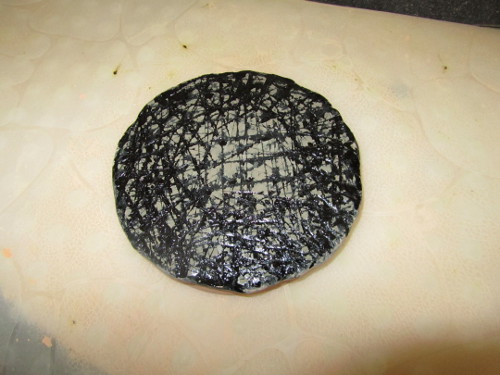
Here is what the 7 inch [18cm] oversized parabolizing lap that I used to parabolize a 6 inch [15cm] F2.8 looks like.
A controlled approach is to use a sub diameter tool in a W pattern. A friend parabolized an 18 inch [46cm] F6 with a 4 inch [10cm] tool.
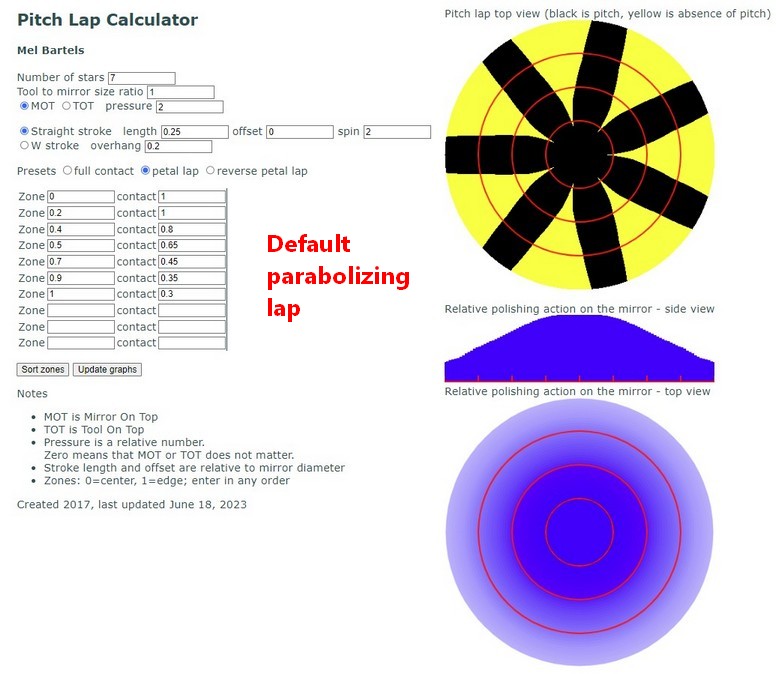
A popular approach is to use a slightly smaller tool, say 0.8 the size of the primary, slightly offset from the center, with the primary spinning fast and the sub diameter tool spinning freely. See my pitch lap calculator for how this works.
Once glass is polished away, it cannot be added back on. The only recourse is to remove all the rest of the glass. We are free to pick a new radius of curvature to minimize the amount of glass removed.
I wrote a pitch lap calculator to help me design my laps. It's proving useful parabolizing very fast mirrors. And I've made a few surprising discoveries, for example, the standard 1/3 stroke with a full sized tool naturally produces an oblate ellipsoid.
Should the mirror be gradually transformed from spherical to parabolic or should the mirror be divided into zones, where each zone is parabolized before continuing on, or perhaps a combination of the two approaches? Some spinning strategies (slightly smaller sub diameter lap slightly offset from the mirror that is spun at high speed face up call) for zonal parabolizing. That is, the 90% zone is parabolized, then the 80% zone and so forth, by gradually moving the freely spinning sub diameter lap inward.
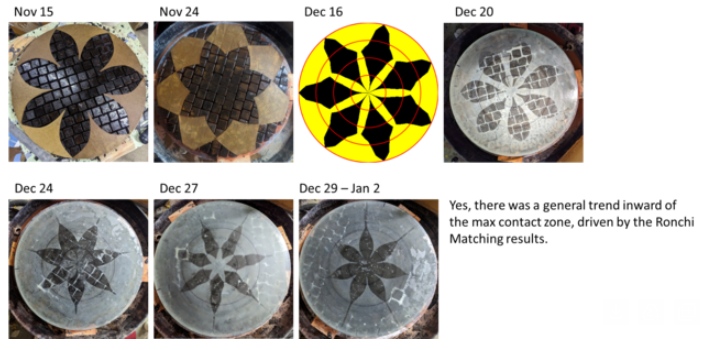
I've had good luck using the 'gradually parabolize the entire mirror' approach. Here we want nearly straight Ronchi bands indicating smooth parabolas at each stage (40, 60, 75, 85, 90, 95, 100 percent correction).
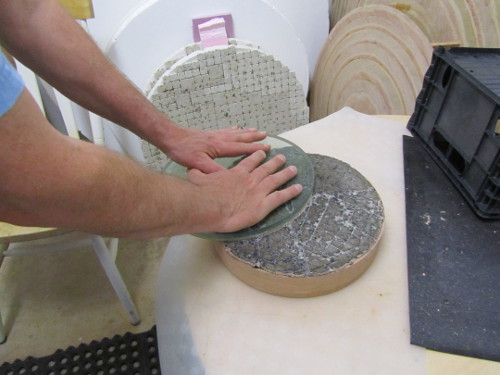
I start with warming the pitch lap with a heat gun. I want the pitch warmed just enough so that it can be pressed into perfect contact. Too much heat will remove volatiles from the pitch shortening its life and warm the glass causing all sorts of havoc. I press the lap for a few seconds, then rotate and reposition the lap slightly and press again. I repeat until satisfied with the contact. After contact I renew the channels and microfaceting with a soapy aluminum bar or wooden dowel. I place the mirror on the lap, rotating and moving every few seconds, until the glass and lap have equilibrated to the same temperature. This whole process takes 5-15 minutes and is necessary for consistent results. However long it takes though, don't settle for less than the perfect contact or good temperature equilibrium.
Best results come with slow heavy even drag. Rotate top piece methodically; walk around or rotate the bottom piece at a slower but regular pace. Start and stop in the same position. Don't be shocked if you are working a very large very fast mirror: you will have to push down harder on the mirror's back to maintain even drag.
Each session begins with
This is recorded in a log. You will find that your personality coupled with the mirror tend to produce similar outcomes. If that particular outcome is not desired, then study your notes for what to do differently.
Remember that you only really need know the worse defect and if the mirror is getting better or worse. Don't become sidetracked into obsessively measuring the amount of deformity. It does not matter - it has to be removed. Use a quick test that qualitatively shows if the defect is getting better or worse. I developed my Ronchi Calc expressily for this purpose.
It's not only learning what to do and why it works, but it is also learning what to pay attention to and what to ignore. Watching an experienced mirror maker deftly go through the motions with such great control may leave you with the impression of casualness even magic but believe me; it's all carefully thought through and tempered with much experience.
Strokes and rotations should be precise with no variation. End at the same rotation point around the barrel as you started. Machines can make beautifully smooth and highly regular surfaces. Be like a machine.
Pitch is an unusual substance in that it flows slowly if pressed, but shatters if hammered. Materials like pitch, felt and paper polish glass whereas hard materials like tile scratch glass.
Pitch is too soft when the channels squeeze out sooner than 20 minutes; pitch is too hard when the channels remain unchanged after two hours. Gugolz 55 pitch used at 65 degrees F is as soft has Gugolz 82 pitch used at 92 degrees F. The softness of pitch should be selected for the work environment’s temperature. The pitch’s softness should also be selected for the optic’s asphericity.
As the mirror’s figure morphs from spherical to paraboloidal the pitch must follow suit. A 6 inch F8 that deviates very little from a sphere therefore is best figured with harder pitch. A 20 inch F4 that deviates greatly from a sphere is best worked with softer pitch. But if the pitch flows too easily then control is difficult. A good rate of figuring change is about a wave per hour of polishing.
Check out the following analysis that shows the number of sessions for mirrors that I have detailed logs.

I draw two conclusions:
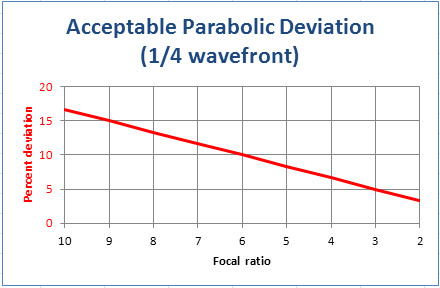
In my experience, focal ratio is most correlated with effort and touchiness during parabolizing. An F3 is difficult at any size, F8 not nearly so much. Parabolizing accuracy in terms of smooth under and over correction depends solely on the focal ratio, not on aperture. For instance, consider the following chart. The graph is for worse case 1/4 wavefront; for the more demanding 1/8 wavefront, halve these values. While slower focal ratios have a larger allowable parabolic deviation percentage, because the paraboloidal correction is smaller, the deviation in absolute terms is also smaller. I derived this relationship by using a standard algorithm that calculates wave error given a set of zonal readings. I iteratively fed it zonal readings smoothly varying by a correction factor, deriving the maximum correction factor that fit the quarter wavefront error envelope.
How did our parabolizing session go? How is our parabolizing process working out? An appropriate mirror test answers these questions quickly and accurately. A good test is always in service to the process unfolding. This is in contrast to testing the quality of a finished mirror.
I select a mirror test based on the process. For example, I need not constantly test for astigmatism when my process precludes it - I need only test during the final verification of the mirror. The Foucault test, for example, is well matched to a process that forestalls astigmatism. Mirror on top of full-sized or over-sized lap is an example of a process that does a wonderful job of preventing astigmatism in unbelievably thin glass.
Mirror test selection also depends on your acceptance criteria. I make my mirrors as good as I can. As an amateur I spend as much as I like on a mirror. I am also keen to improve my mirror making technique. Psychologically, errors that remain are worse than I think: all the more reason to try removing them. I concentrate on deviations from the ideal paraboloid, not worrying about a deviation’s hard numerical value, which would be the case if I were making the mirror to an arbitrary numerical rating.
As I develop my process, a good mirror test tests not only the mirror, but the process itself. A test is judged for its fitness to purpose.
To say it again, testing a finished mirror is an all-together different beast.
A perfect mirror is limited by the wave nature of light. Fraunhofer diffraction of a circular aperture, the mirror's rim, sets the limits of performance. The circular rim of the aperture diffracts light into expanding spherical waves that interfere with each other at focus, going in and out of phase repeatedly as the angular distance from the center grows. This creates a central dot, the Airy disk, and a series of rings of decreasing brightness. A perfect mirror will reflect 84% of the light into the Airy disk, 7% into the first ring, 3% into the second ring, and so forth, with a total of 16% of the light in the rings combined.
Less than perfect optics increase the brightness of the rings causing the star image to lose resolution. Our mirror should present very close to the ideal Airy disk with approximately the same brightness in the rings. Geometric based methods that calculate the path of the reflected light rays across the mirror face are popular and have a long history. These tests typically measure the longitudinal aberration, or the discrepancy between where the light ray geometrically would travel to compared to where it ought to be. However, geometric tests need to be used with the understanding that when errors are small the light does not go exactly where the geometric ray trace goes, thanks to the diffraction of wave optics.
Autocollimation can be used with many tests. Autocollimation testing reflects the light from the mirror back on to itself using a large flat. Double the accuracy and a null test to boot.
The Ronchi test is quick, easy and made from simple materials. Quickness is vital as I need to devise my next figuring strategy and make adjustments to my stroke or pitch lap and get on with it so that I can accomplish five or six figuring sessions in a single evening. Large and fast mirrors simply require many figuring sessions so the answer is to be able to get through them quickly. Easy is a must too: no touchy setups or finagling nor a slew of images to be combined later. I leave my tester and mirror stand in place between tests. Accuracy means precision and repeatability and suitability to purpose. I need to precisely see all the mirror's errors, I need to see them consistently and I need to judge and prioritize the errors so that I can devise the next figuring step. I do not need to know if the error is say, 1/7 wave or 1/8 wave - I merely need to see the extent and severity of the error. The Ronchi test is blazingly fast and accurate given experience.
The Ronchi test uses a grating placed in front of a light source that we then look through at the returning light.
I've developed three variants of the Ronchi:
The Bath Interferometer is absolutely wonderful, a revolution in the making for amateur mirror makers. The reference and test light beams travel the same path, negating instrument and air differences. By determining OPD (Optical Path Difference), the mirror's surface profile can be calculated. Invented and patented by Karl-Ludwig Bath, Wolfgang Rohr popularized the test while Dale Eason has written sophisticated open source software.
With its accuracy and objectivity, the test is particularly suited for final parabolizing. Watch out for the tendency to chase zones with too small of sub-diameter tool to hit the numbers but that results in rough surfaces.
The Bath IF is one of three major advances for amateur mirror making. The other two are the quality standard that Carl Zambuto set and John Dobson's development of techniques to handle large thin glass, culminating in Steve Swayze's 40 inch [1.06m] telescope in 1994.
See the Bath IF group's Wiki, Dale Eason's DFTFringe software, a 3D printed tester. Finally the discussion group is here
Use the star test for final characterization. It's time consuming and depends on clear skies with decent seeing. The indoor star test can be used for figuring but can require a quality telescope of equal or greater aperture.
The star test reveals grave injury as well as meaningless slights. It is up to you to interpret their impact based on your observing needs. I like this better than quantitative tests that imply that someone else's defined error is acceptable and that give you a single number. How can a single number truly describe a mirror's performance on such a wide variety of astronomical objects?
Every time I focus a telescope it comes a star test. I've noticed a trend. Mirror makers that used the star test or the interferometer test consistently make better mirrors. My experience from star testing hundreds of telescopes over the decades is that almost every mirror has discernible defects. The defects in the best mirrors have no detectable impact on the image. The defects in the average mirror have a slight impact on the image, often outweighed by the myriad of issues that accompany telescope use.
You too can learn to star test with practice, particularly if you star test your mirror as you parabolize.
John Dobson wrote in the Celestial Observer, 1973, published in San Diego, California, 'The bright spot ... is thrown out of focus first one way then the other by pushing the eyepiece in and out. The two resulting discs of light should be the same. If they are not the mirror needs to be dug in those areas that bundle too much light when the eyepiece is too far out.'
Remember his simple words. He knows what he's talking about. I've star tested his 24 inch [61cm] F6.5 mirror and it is very good. He gave me confidence that the star test was a serious, discerning and demanding test. So I learned the art of star testing. The quality of the view through the eyepiece is subjective. Stirring in numbers like peak to valley wavefront rating, r.m.s. wave error and Strehl ratio confuse as much as they clarify. The beauty of the star test is that you get what you see. And it is all done with a simple high power eyepiece on a night of good seeing. The experience of focusing stars in countless telescopes is invaluable. Every mirror will show errors or deviations in the star test, some greater that are injurious to the view, some hard to see and completely inconsequential.
It is a simple rule of thumb: rack the eyepiece outward. Those areas of the mirror that appear excessively bright or have bright rings need more polishing. Rack the eyepiece inward. Those areas of the mirror that appear excessively bright or have bright rings need less polishing.
Allow me to offer an unsolicited testimonial from well-known telescope maker and interferometrist Dale Eason. 'A few years ago I met Mel in person for the first time at a Star Party in Wisconsin. We had communicated for year on the net. I had my 16 F5 telescope whose mirror I made and knew very well from the interferometry data. The telescope itself was still a work in progress and I think the mirror was not yet coated. The telescope had no tracking and was very unstable. It jiggled when you toughed the eyepiece. Mel wanted to star test it so I let him. He did not know the interferometry data from it. He took about one minute and then he proceeded to describe its faults that I knew from interferometry and described their position on the mirror. That man can star test' --- Dale Eason
What does finishing with the star test get me? The answer is a smoother and better fitting paraboloid with a much tighter looking star test with greater focus depth.
The star test not only validates parabolizing done with other tests but also shows what will be seen every time an eyepiece is focused. There will be no surprises after the mirror is coated.
Real life practical issues show in the star test such as thermal issues while the mirror is cooling. For example mirrors usually look overcorrected while cooling.
Final parabolizing by the star test serves to check the entire optical train including eyepieces. Eyepieces can have significant spherical aberration which appears in fast systems.
I devote an entire webpage to the star test here, including a little known indoor star test option.
Foucault's test (we use it differently today) revolutionized mirror testing. The Foucault test is responsible for more quality mirrors than any other test. Today we use a Couder mask to cover the mirror so that only one mirror zone at a time is visible. We use a knife-edge traveling on the longitudinal axis to cut the light coming from the zones, measuring where each zone crosses the longitudinal axis (note that the light focuses beyond the axis). From this we obtain a series of zonal readings that are then compared to computed numbers. A variant is Mark Cowan's Unmasked Foucault that uses image analysis to detect the crest of the Foucault donut for each zone.
David Harbour's Understanding Foucault is an excellent resource as is the Stellafane website.
The Caustic test measures the focus of a zone using both transverse and longitudinal aberration, taking advantage of the fact that zones actually focus along a caustic curve. As such it can be exquisitely accurate (note that higher order terms may need to be incorporated into the standard formulae for large fast mirrors). See modern online sources and the ATM book series.
I use the Poor Man's Caustic Test to achieve good zonal readings. There's precious little information on the test and how to use it; I'm including detailed comments for the interested.
Here you can see the mirror's 70% zone focusing past the mirror's longitudinal axis. Each zone focuses along a curve called the 'caustic'. Interestingly the caustic curve was first drawn by Leonardo da Vinci in the early 16th century who imagined that the clear lens with such a curve would magnify light. Da Vinci came tantalizingly close to inventing the telescope. But he didn't understand that light has a wave nature that calls for extremely accurate lenses and mirrors, a thousand times more accurate than he realized. Not to mention the impossibly poor glass of his era.

The first shadow and last light do not focus on the mirror's axis; instead the light comes to focus past the axis to the sides. These points have a displacement to and fro the mirror's face and also laterally, left and right. The full form of the Caustic test measures both the 'x' and the 'y' displacement, computing the location of focus. In the Poor Man's Caustic test, or 'version 2' of the test as the ATM book series article titles it, only the 'y' displacement to and fro the mirror is measured. The 'x' displacement is not measured; instead, using the Everett stick bar, the zone of first light and last shadow as seen on the mirror is noted.
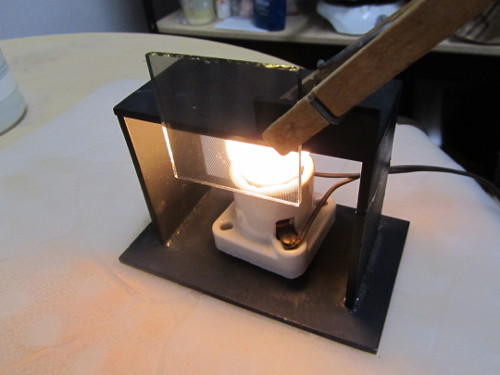
Image the familiar donut shape as seen in a knife-edge test. Initially, as the knife-edge is moved from one side to the other, a shadow forms. The knife-edge is at the radius of curvature for the mirror's zone where the shadow first appears on the mirror's face. As the knife-edge completes its movement, the knife-edge is at the radius of curvature for that zone on the opposite side of the mirror as the light shrinks to its final rays, leaving the mirror in shadow. I use a fixed slit for light source and a stage where the knife-edge is moved to and fro the mirror with measured micrometer movements; the knife-edge can be rocked in a wide arc laterally to the mirror (right to left). I place an Everett stick horizontally across the center of the mirror's face with pins representing the zones to measure. I also use strips of printer paper marked with the zones radii.
Here we start with the sketch as pictured on the right with first shadow appearing on the mirror's right hand side's 70% zone. As the knife-edge cuts further, the zone's width and height increases, eventually leading to the familiar Foucault donut as the knife-edge crosses the mirror's axis. This is pictured in the center sketch. As the knife-edge continues its arc, the light begins to shrink to an arc on the left hand side of the mirror. Eventually the light disappears in a tiny arc centered on the 70% zone as pictured in the left most sketch.
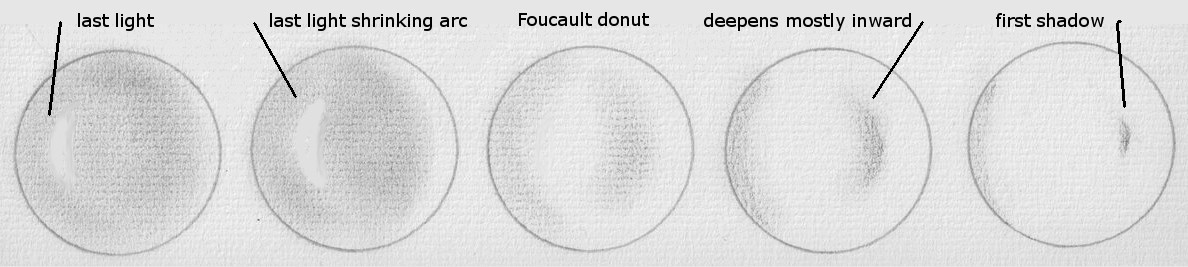
Be careful when measuring the zone: as the first light or last shadow collapses from a broader arc to a thin line (assuming very narrow vertical slit high intensity light source), the point to measure appears to move to the outside edge of the arc. Demonstrate this to yourself by rocking back and forth with the knife-edge.
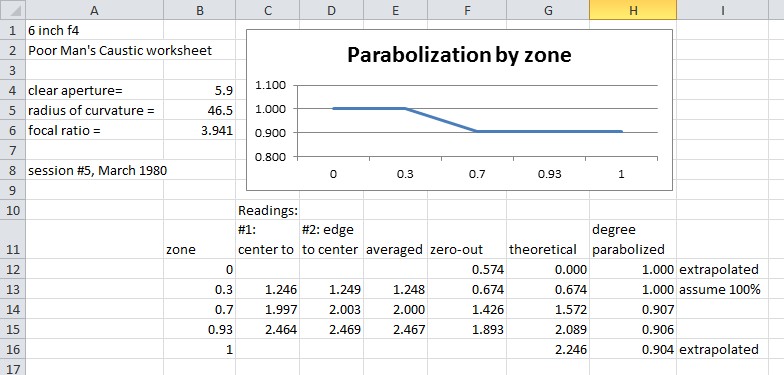
I settled upon at least three zones: the 30% zone, the 70% zone and the 93% zone. The center and extreme edge are difficult to measure and are best extrapolated subjectively using the knife-edge to look for a smooth curve across the center and for a good ring at the extreme edge. I screw the stage to and fro the mirror until the first shadow and last light form at the sticks placed across the center of the mirror's face. I start with the 30% zone, then work out to the 93% zone, taking a second set of readings working back to the 30% zone. The readings are averaged.
A quick derivation from the equations describing the mirror's radius of curvature shows that the readings need to be divided by 3 to match the readings from the fixed-source Foucault test. Essentially this test measures the change in slope of the mirror's surface, or the second derivative of the parabolic deviation from spherical.
Here's an example from a 6 inch [15cm] F4 in progress. Test results show that outer half needs a bit more parabolization.
Advantages are: focusing attention on one side then the other, unlike the Couder Mask where you have to judge both sides of the mask simultaneously; a poor curve with zones is readily apparent. Disadvantages: takes practice to discern exactly where the shadow first appears and light last disappears.
Using this test I could see the mirror's radius of curvature expand over time as the temperature in the test hall changed. I saw that while fast mirrors had sharply delineated arcs that were easy to measure, very small changes in the tester's position along the mirror's axis down on the order of a thousandths of an inch changed the zone being read.
The wire test is instructive and useful for larger faster mirrors. Here the thinnest possible wire or thread is hung just above a pinhole light source. A parabolic mirror returns a vertical shadow and a circular shadow that is used to measure zones.
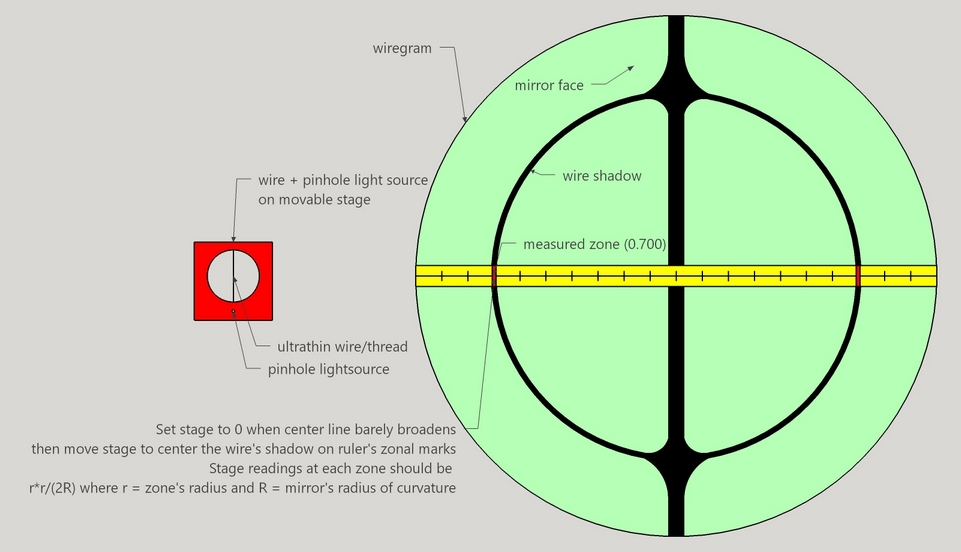
Just like the Foucault test with knife-edge creates donut shaped shadows, the thin wire creates circular shadows.
The Ronchi test can also be used as a wire test. Go here for details.
I've used the Ross Null test briefly, ending up using it more for overall smoothness than for exacting spherical aberration correction. It was a favorite with Steve Swayze.
Check out a new test called the Slit Image Test by Bill Thomas.
Also check out the holographic mask test and my online version that runs in your webclient.
The Spherical Null test as popularized by Tom Waineo.
The Hartmann test uses a mask with holes, then measures the holes' displacements.
The Shack Hartmann test replaces the Hartmann 2D screen and its holes with a lenslet array.
The SCOTS test, a slope test, is intriguing.
Mark Cowan developed the Unmasked Foucault Test.
There is a slew of test ideas in older optical shop texts, tests not developed for lack of computing power. Today we have oodles of computing power. In fact, large language models may find new tests for us.
Reducing zonal readings is a mathematical exercise. But what does the resulting number, for example 1/6 wavefront mean? Is it good enough? What if there is a turned edge or a high center or a noticeable zone? Is it all about the number or not? Behind every number is a subjective judgment, not only regarding the number itself but the about the errors that led up to the number. The reality that it's the entire telescope, the atmosphere and the observer's experience that combine to produce an outcome at the eyepiece that's judged. If it's subjective, at least to some degree cutting to the chase and using subjective tests is the most direct way to an excellent mirror. After all, by using the Star Test you know exactly what you will get each and every night, under the sky conditions that you'll be using your scope. The drawback is that subjective tests call for experience and judgement. A test that results in a quantitative result builds in judgement. Still, such test results are subject to human psychology, such as numbers creep and exceptionalism. If 1/8th wave is the standard, maybe I should ask for 1/10th wave; in any event, I paid a lot of money for this mirror and I demand selection of the litter.
Which path to choose if you are beginning? My suggestion is to find a mentor that you like and follow their process. As you first copy then learn by repeating, you'll develop into your own personality, eventually striking out in your direction. Me? I like to learn by studying the reports of the old masters from the late 1800's when American mirror making first flourished. These makers encountered and overcame the seminal problems. Today, we have unprecedented access to information and software like Dale Eason's DTFFringe that enable inexpensive interferometric testing. Testing early mirrors from decades, even a century ago, show rather mixed results. Nonetheless, mirror making has drifted as twists and techniques have been modified and overlaid on top of the initial masters - sort of a random walk. The result is a certain lack of appreciation for the core problem in mirror making, namely parabolization. For instance, mirror makers can measure lots of zones today, so we use sub-diameter laps that rough up the surface in order to attack the zones, sometimes forgetting the initial masters' admonition of the importance of a smooth overall mirror figure.
I advocate investigating accidents and happenstance. One day when pitch gradually squeezed past the edge of the lap while polishing I happened to stop and test the mirror's figure. I was sure I had done something terribly wrong. But to my astonishment, there was no turned edge! I removed the pitch that had squeezed past the edge, polished more - the narrow turned edge reappeared. I asked a couple of professional opticians discovering that they occasionally employed oversized laps. Investigating the original masters I found that John Brashear advocated oversized laps along with petal laps, another area that I was sliding into.
Is it the testing method? Is it using rouge instead of cerium oxide? It's you - your personality, your self-awareness, your patience and discipline - these are the greatest determinants for success. And always keep in mind that the test is in service to the process and strategy of parabolizing.
Be cautious, thoughtful, yet curious. Look for defects because they are surely there, confirm with the star test and become conversant with more than one test. Finally, practice, practice, practice by making mirror after mirror after mirror. Give them to friends or barter them for eyepieces or other goodies (I once made a 20 inch [50cm] mirror in exchange for a fully enclosed trailer to transport a large scope of mine).
Regardless of the tests you use, you will face high zones that need more polishing, low zones that frustrate you, turned edges that are plain annoying and astigmatism that can result in temporary insanity. Above all, it's the combination of sky, observer, telescope and optics that create the view. So let us get on with the task of creating the very best primary mirrors.
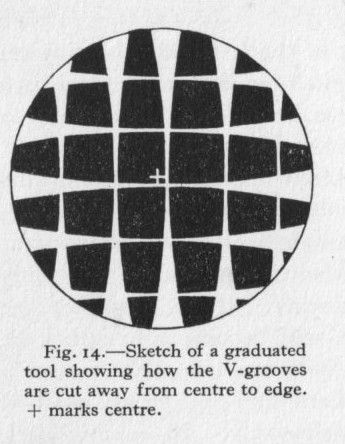
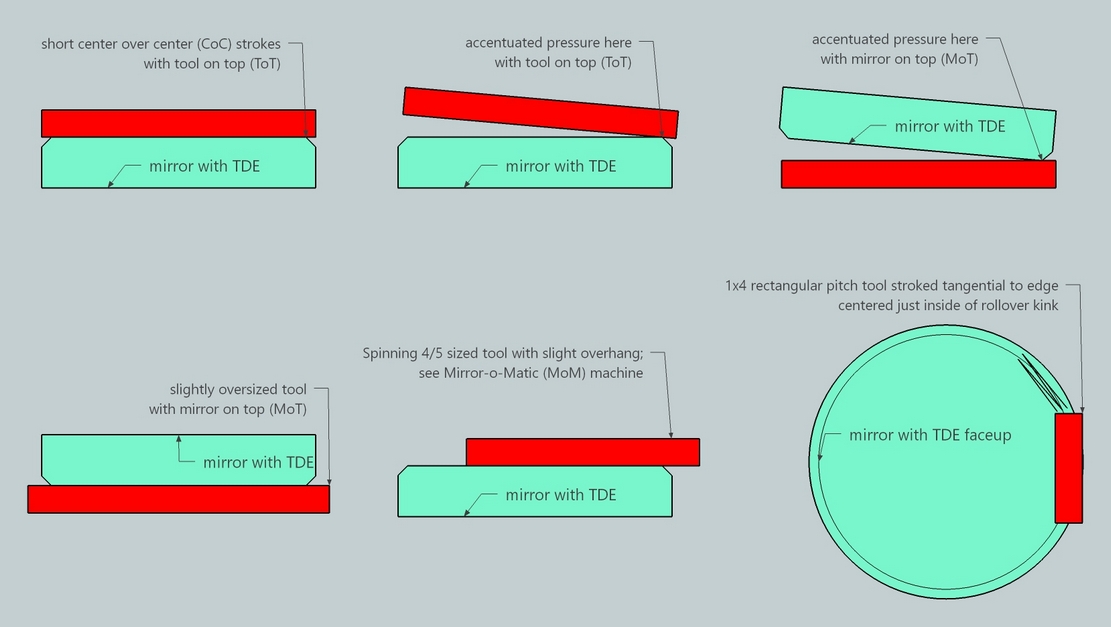
Stroking a full-sized polishing tool against the mirror using one-third long strokes or spinning a 5/6 sized tool on the mirror drives the mirror's surface spherical. What can the mirror maker vary to induce a paraboloidal curve on the mirror's face? We know that polishing is a result of time, pressure, speed, and polishing compound. While accentuated pressure is occasionally used to fix a zone, it isn't used to parabolize because it isn't consistent. We can't easily vary speed or polishing compound, so that leaves time.
We vary time of polishing by lengthening and widening the stroking, by using a smaller pitch lap, or by altering area in contact of the lap. While it's possible to combine these techniques, it's saner to vary just one and control for the others.
Lengthening and widening the stroking using mirror on top is arguably the most popular technique. It's well described in popular telescope making books.
Mirror makers turn to sub-diameter laps for larger faster mirrors with the popularity of mirror making machines that spin the mirror. Deep parabolas can be carved out and zonal irregularities attacked. However surface smoothness is an issue.
A smooth mirror surface along with deep parabolas can be achieved with full-sized or over-sized pitch laps by varying the pitch lap's area of contact. Strokes are kept simple and constant. Since pitch is a source of variability due to hardness, thickness and temperature, this approach constrains all the variables into the pitch lap. I find great success with this approach, a technique not widely used today but popular in the past. Brashear writes, 'After six years of labor I reluctantly gave up the pursuit in this direction [a machine constructed so as to give an intricate motion to the polisher]... I have been led to this conclusion: that, given a properly shaped polisher, surfaces of the highest excellence may be produced; either by hand or machine work, and that the simple rotary and reciprocal motions are all that are necessary to be given to the polishing tool.'
It's easy to concentrate on 'hitting the number', foregoing mirror smoothness. For many, hitting the numbers is less difficult with sub-diameter laps. The problem with these laps is that they promote roughness. Imagine you are icing a cake or pouring a concrete pad. What happens when you use a tiny spatula or trowel? No matter how hard you try, the surface will not be as smooth from edge to edge as that gotten from a large spatula or a wide trowel. A surface worked with a sub-diameter lap needs smoothing with a full sized lap. But this changes the figure subtlety. I chose to parabolize with full and oversized laps.
Zonal problems show up in 12 inch [30cm] and larger mirrors because these larger mirrors are often worked with sub-diameter tools. The first masters (Ritchey) used very large laps to generate smoother surfaces. We forget the lessons learned by these pioneers.
Finally, there's another drawback to sub-diameter laps that no one seems to notice. A parabolizing tool 1/3 the diameter of the mirror works at 1/9 the speed of a full sized tool and even slower compared to an oversized tool.
Highly aspheric mirrors, mirrors that are large and very fast, face a crumbling precipice between larger laps and smoother laps. Larger laps smooth better but have trouble fixing narrow zones and cannot keep up with the changing slope of the mirror as the lap moves across its surface. On the other hand, smaller laps handle the changing slope across the mirror's face but have trouble fixing large scale correction issues. I find success with thick and soft pitch in the shape of petals and stars used on a relatively thin plaster tool that's supported by a thick rubber mat.
Researching further, I found that Brashear mentioned oversized laps as a standard technique in the late 1800's. Oversized laps were used almost from the start of glass mirror and pitch tools. You see, during that era, there was an explosion of pamphlets and small books on how to do things. Telescope making was a 'big deal' back then. Holcombe had formed the first USA telescope company in the early 1800's (to the surprise of leading European intellectuals who maintained that Americans were not up to the task), followed by Fitz and Clark which was followed by Brashear and others. Check out The Production of Optical Surfaces by John Brashear, Pittsburgh, Pennsylvania, 1881. Also see Strong's Procedures in Experimental Physics for a modern treatment of oversized laps.
I use slightly oversized laps to better control the edge. The lap pattern and strokes are the same as for standard sized laps. Actually, any sized lap will control the edge - it is a matter of technique. Many amateurs have trouble with turned edge using subdiameter and full sized laps. I've had far less trouble with oversized laps.
No matter what goes on, strive for a smooth curve on the mirror. Fixing a kink only to create another kink is no progress at all. Parabolizing consists of approaching full parabolization always ensuring a smooth curve.
Outside of proper parabolization, edge problems are the most common maladies afflicting mirrors. A turned down edge, or TDE, is a narrow zone, no more than 1/8 inch [3mm], at the extreme edge that turns downward, focusing long. If the zone is wider then it is called a rolled edge. Rarely the extreme edge will turn upward, focusing short. This is called a turned up edge.
TDE is readily detected in the star test. A hairy edge inside of focus and a bright outer ring outside of focus indicates that the mirror's edge is focusing long.
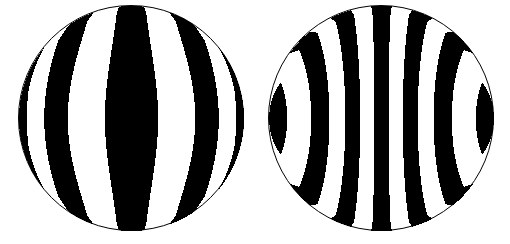
TDE is also easily detected in the Ronchi test by looking for hooks at the ends of the bands, particularly noticeable when testing outside the radius of curvature.
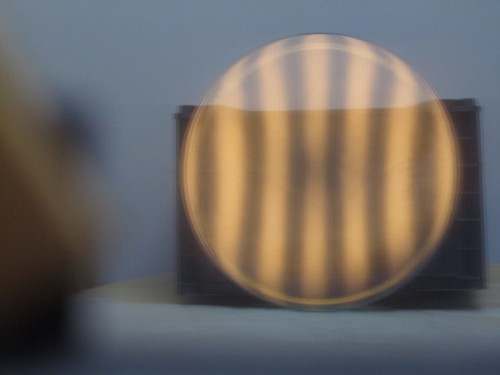
Here are computed Ronchigrams for a 10 inch F5 with 1/2 wavefront (1/4 wave on the mirror's surface) TDE. See how the bands hook?
There is a great deal of superstition on turned edges since they can appear unexpectedly and are not usually quickly fixed by amateur opticians. The earliest optics exhibit terrible edge problems, so it's a malady that's afflicted opticians from the earliest times.
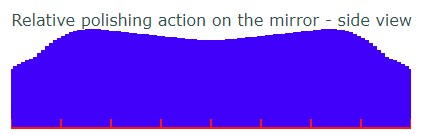
While TDEs can be caused by too soft of pitch plowing into the mirror's edge as it is stroked back across the mirror's face, more usually TDE is caused by the extreme edge's lack of equal polishing action. We see from my pitch lap calculator that the edge receives less polishing action when using full sized tools with hand stroking.
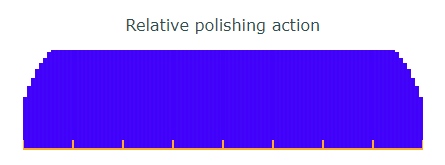
Polishing in amateur hands typically drives the mirror to a shorter radius of curvature. Since the edge receives less polishing, it lags behind, hanging onto its longer radius of curvature.
Common thinking is that a TDE can be caused by warm fingers curled over the mirror's edge. This is rare.
What to do about it? It's been said that professional opticians charge double for work good to the extreme edge. A simple solution is to very carefully bevel the turned edge off. Another solution is to use a retaining rim to restrain the mirror in the cell. One of the most popular lines of telescopes, Cave Astrola, used such a retaining rim. I never saw a turned edge in a Cave telescope! The amount of light lost is very small, maybe 0.02 magnitudes of light, which can be made up for with better coatings, cleaner mirrors or observing on clearer nights.
I use slightly oversized laps that give the extreme edge equal polishing action. Otherwise, removing TDE takes time because the mirror's entire surface has to be polished down to the level of the turned edge. Remember that at the radius of curvature the center has to focus short compared to the edge. Simply lowering the edge by attacking the high point where the turned edge begins to plunge downward is not completely sufficient because that will leave progressively higher zones towards the center, resulting in an under-parabolized surface that requires more work.
The mirror's edge can cool quicker than the mirror's front surface, causing an apparent shrinking of the mirror's edge - TDE.
A Ronchigram would be helpful to judge depth of TDE.
Consequently TDE should be dealt with before parabolizing. Either accentuated pressure with MOT or TOT or a rectangular tool about 1 inch x 4 inch [2.5x10cm] in size stroked over the high point just interior of the TDE will smooth out the TDE quickly.
If the overcorrection is mild, try rubbing down the surrounding zones with short strokes combined with longer smoothing strokes, avoiding contact on the overcorrected zone.
The fix for strongly overcorrected outer zones is returning to a sphere. This can be done with 1/4 to 1/3 long center over center strokes. The edge can be flattened with a pitch lap configured so that contact lightens inward like this:

Look at a spherical mirror being tested at the radius of curvature compared to being tested at the telescope. Note that the sensitivity at the telescope is halved. Depending on where the grating is placed, zones will be closer or further away from the grating, making the bands tighter or conversely more spread out.
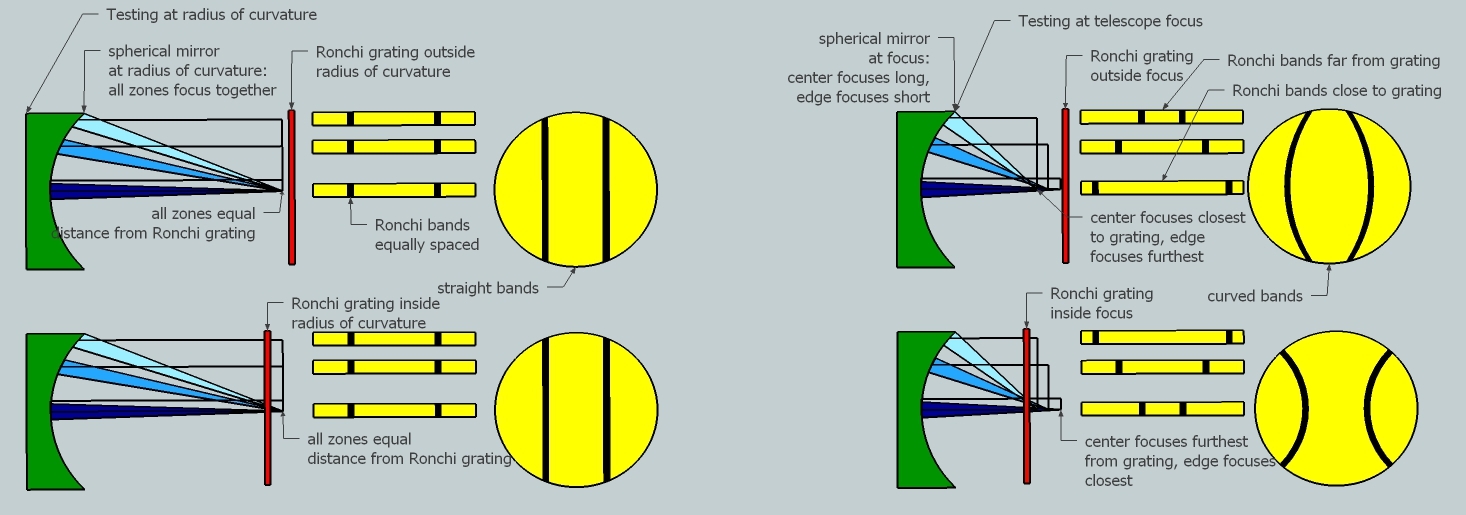
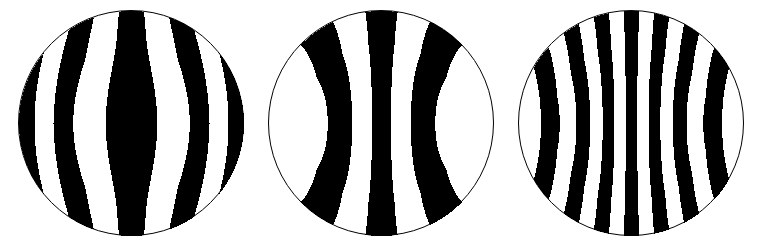
Here are the computed Ronchigrams for a spherical mirror starting inside radius of curvature and ending outside radius of curvature.

Compare to a parabolized mirror, where the radius of curvature Ronchi bands are curved but those at the eyepiece are straight.

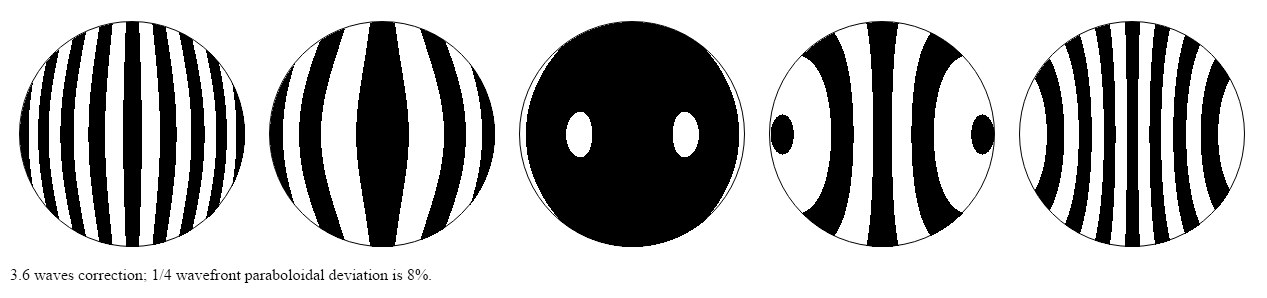
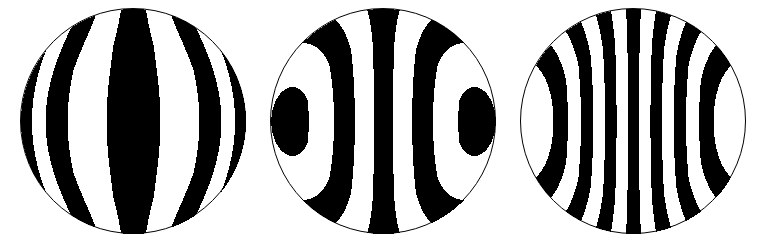
Here are the computed Ronchigrams for a 10 inch [25cm] F5 mirror with the grating offset relative to the radius of curvature -0.3, -0.1, 0.086, 0.3, 0.5 inches, the middle position with the grating on the 70% zone.
Now we can extend this to zones. Let's look at the 70% zone again.
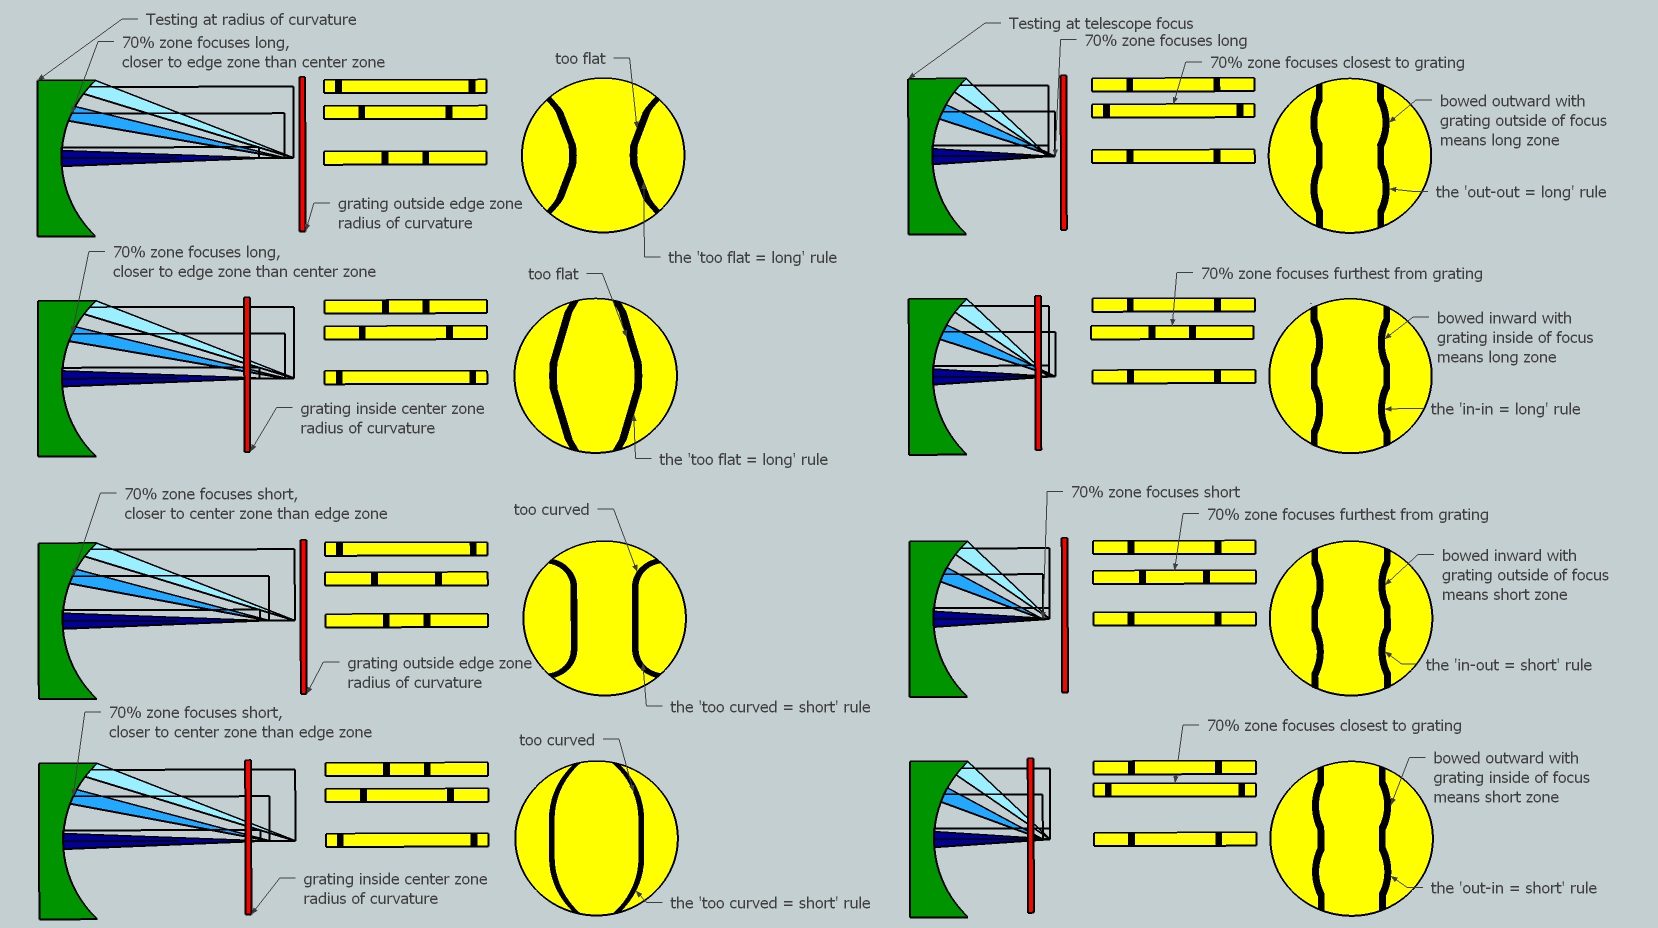
Here are the computed Ronchigrams for a 1/2 wavefront high 70% zone followed by computed Ronchigrams for a 1/2 wavefront low 70% zone.
We can see generalized rules:
Combining these rules at the telescope, when the band bends towards the grating, the grating's position with respect to focus tells us when the zone is short or long; when the band bends opposite the grating's position, the zone is opposite the grating's position vis-a-vis focus.
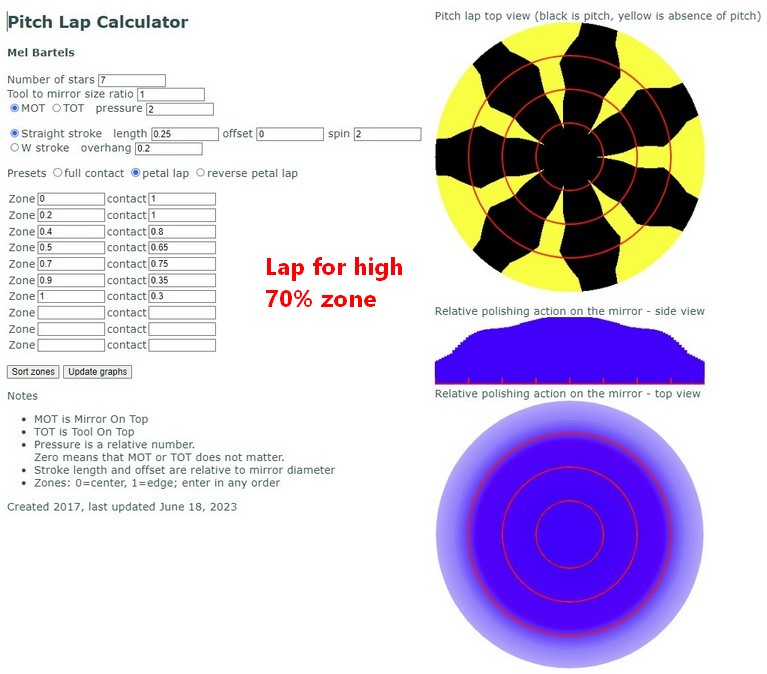
A long or high zone needs more parabolizing while a short or low zone needs the surrounding glass polished.
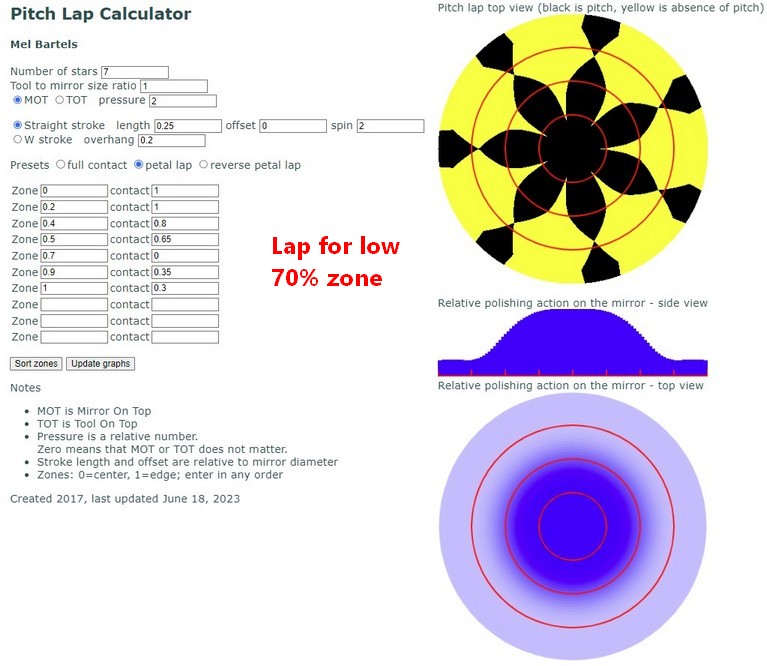
The fix for a low 70% zone is polishing the high center and high edge down to match the low 70% zone. Another approach is to polish the zone broadly, smearing out the kink, leaving an easier to fix high center and high edge. Regardless, the zonal reading difference between the various zones must match the calculated values. For example, a 10 inch [25cm] F5 has a zonal reading difference between the edge and the 70% zone of 0.06125 inches [1.56mm], and between the 70% zone and the edge, an additional 0.064 inches [1.62mm].
The mirror's surface is curved with varying slopes that direct the parallel light from afar to a point of focus. Tests like the Foucault and Ronchi are slope tests: they measure slope. Tests like the Bath Interferometer measure Optical Path Difference to derive the mirror's surface profile. Slopes can be calculated from the mirror's surface profile. While slopes can be strung together to calculate the mirror profile, they are not the mirror's surface. Thinking in slopes and testing directly with slopes is very useful when considering how to bring light together to form a nice tight star image or a nice sharp planetary image (as long as we understand that the tightly focused light forms an Airy Disk with rings due to diffraction - our goal is to form a perfect Airy Disk and rings). Here is how I think about slopes and deal with, in this case, a low 70% zone.
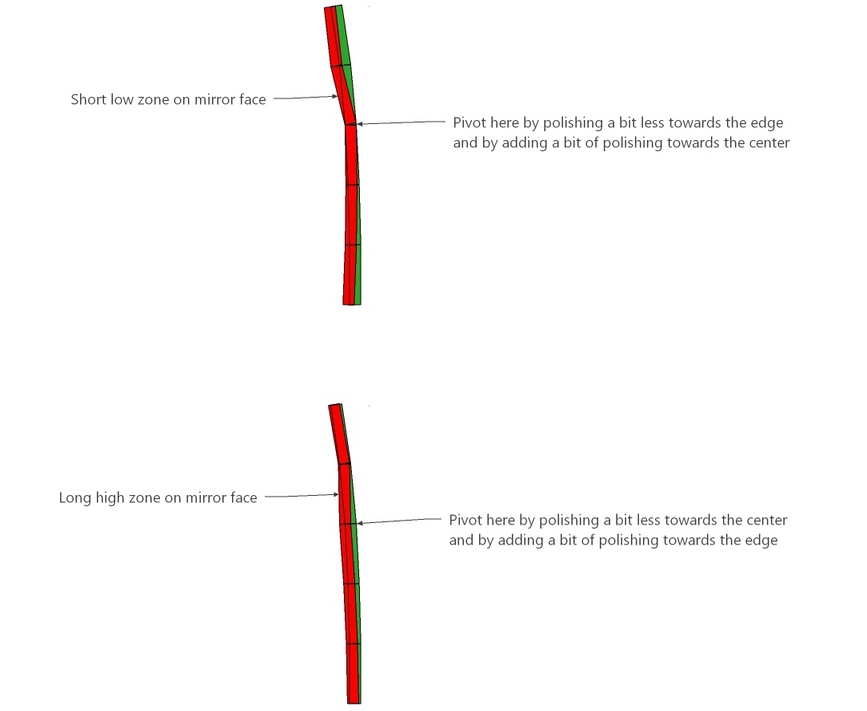
Here is how I fix low and high zones.
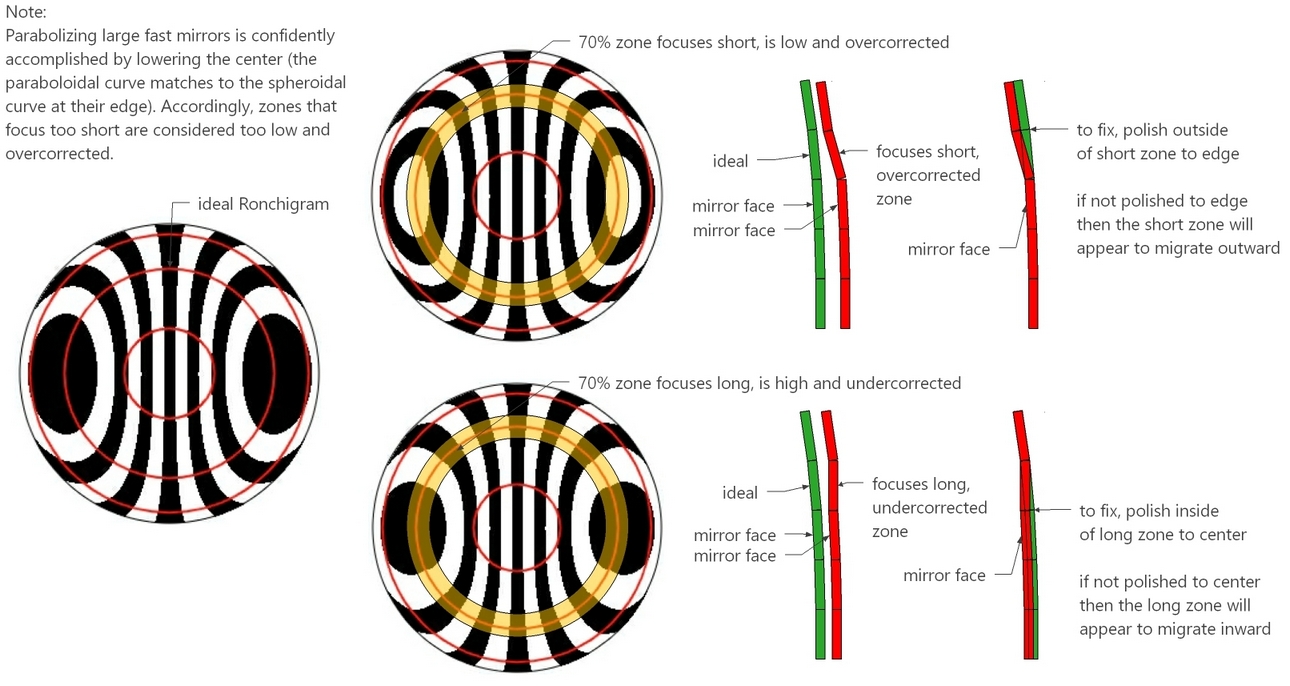
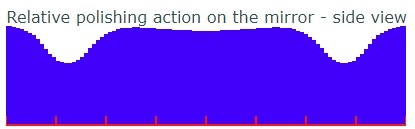
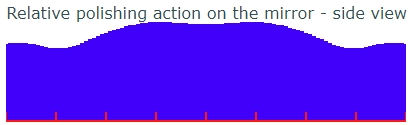
In particular, I like to pivot the work, bringing a bit of balance to polishing the mirror as a whole. The result is close to the dictum, "Polish the long and high areas; avoid polishing the short and low areas". The difference here is that for short low zones polishing should be emphasized just beyond the zone to avoid the zone appearing to migrate outward. And for high long zones polishing should be emphasized inside the zone to avoid the zone appearing to migrate inward.
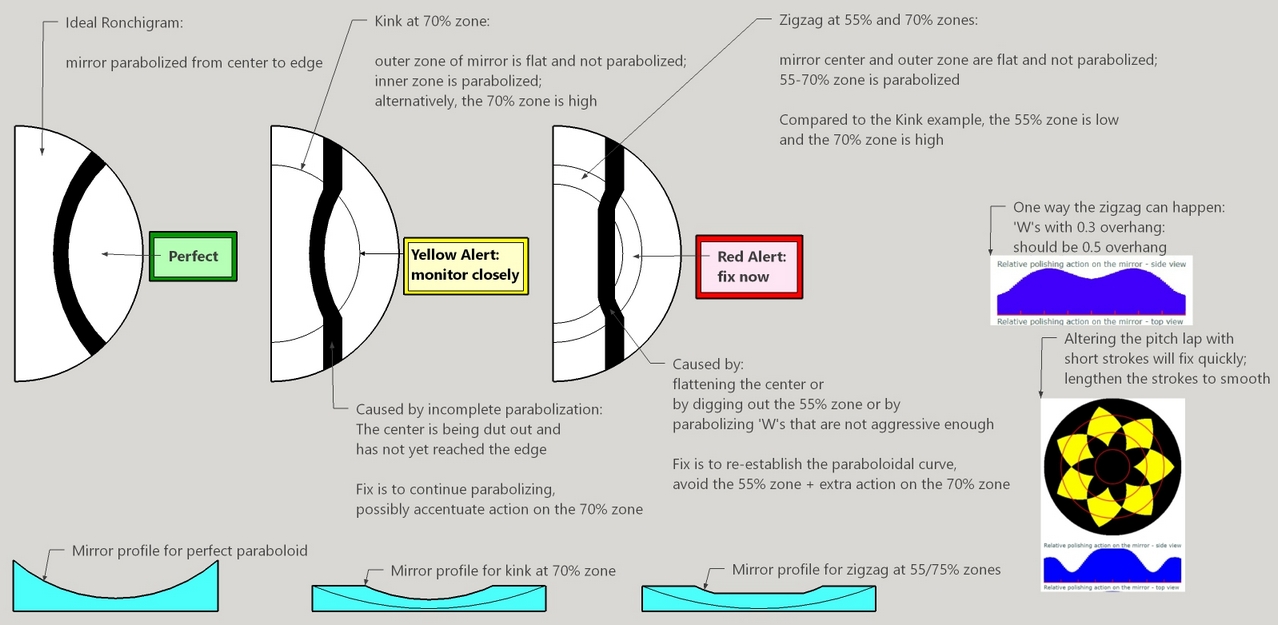
When using an altered pitch lap (pitch contact missing or extra pitch lap contact added), keep the strokes short to emphasize zonal action. This will tend to rough up the overall curve. Extend stroke length to smooth it all out (OK to leave altered pitch lap as is). Here are two examples, the first with 0.2 stroke length and the last with 0.35 stroke length: a big difference.
Using a spider lap, correct low and high zones like this. Remember that short center over center strokes 1/5 long emphasize fixing the zone but at a cost of roughing up the paraboloidal surface while longer 1/3 strokes smooth the curve but act on the low/high zone slowly.
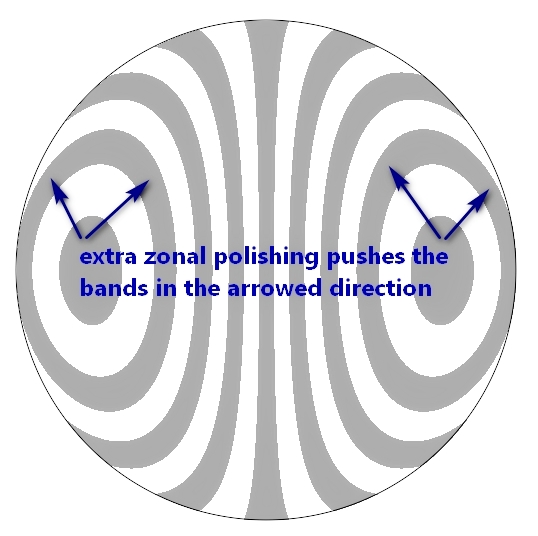
If in doubt, remember that extra zonal polishing pushes the Ronchi band in the arrowed direction; removing polishing action from a zone as just discussed pushes the bands opposite the arrowed direction.
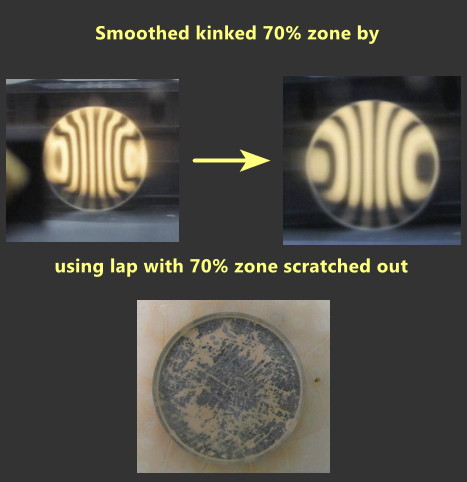
Here's a real life example of how I fixed a kinked 70% zone.
The dreaded zigzag occurs frequently with mirrors that demand large amounts of parabolization.
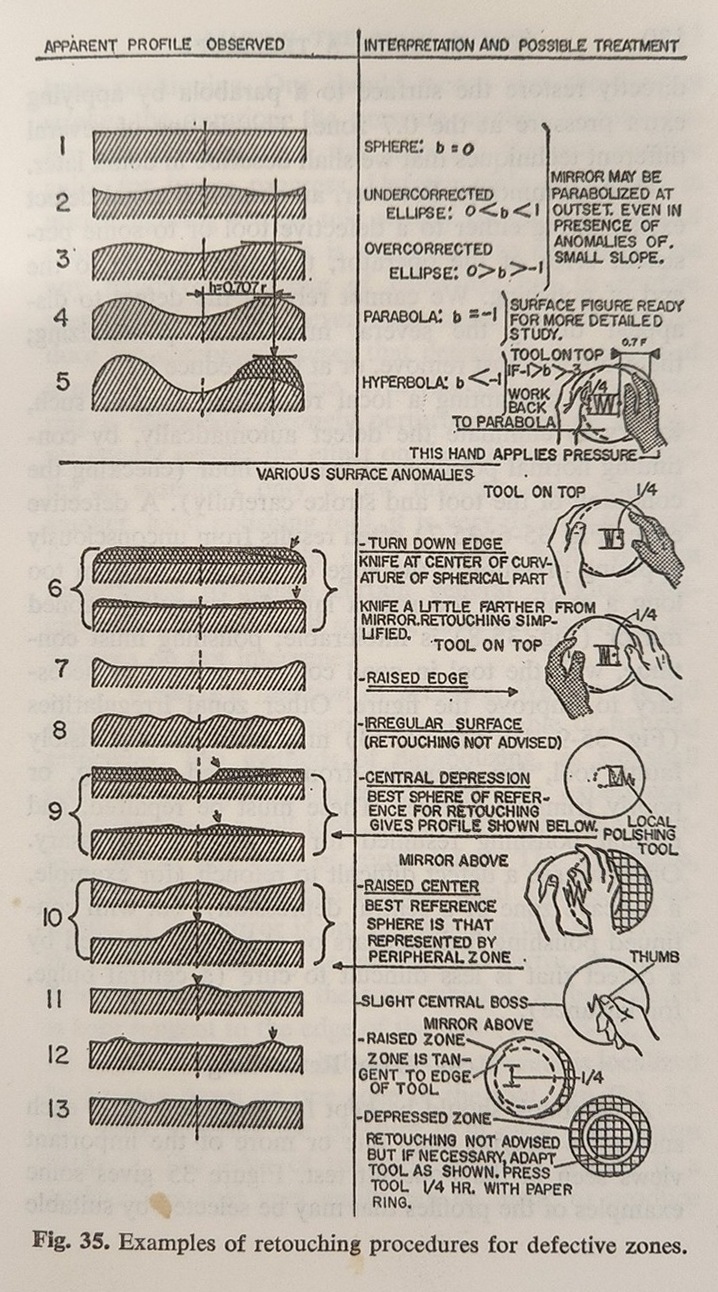
This is consistent with Texereau, How To Make A Telescope, 1963.
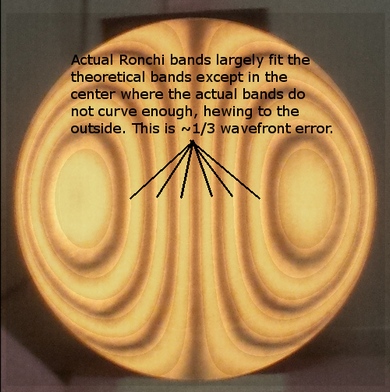
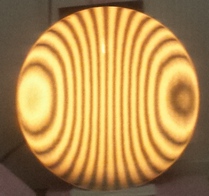
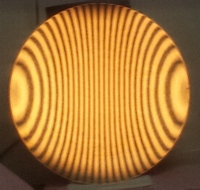
The actual and theoretical Ronchigrams can be compared or overlaid in order to determine the next figuring step.
Here's an actual example, a 25.1 inch [638cm] F2.62 in progress, showing that I need to deepen the 75% zone and a broader 25-50% zone area (the high 75% zone was measured at 1/4 wavefront undercorrected).

Here's another example with the same mirror in progress, where the center is undercorrected by about one-third wavefront. The star test looks modestly undercorrected, passes the snap focus test but fails the diagonal breakout test.
For more examples, see my mirror making logs:
Making a 16.25x3/8 inch [410x10mm] F2.9 mirror
Making two 30x5/8 inch [760x16mm] F2.7 mirrors
Making a 25x1/2 inch [635x13mm] F2.6 mirror
6 inch [152mm] F2.8 mirror
It's a rule of thumb in star testing driven parabolizing (using either real stars or indoor artificial stars) to 'polish the zone that focuses long'. More precisely we want to alter the slope of the zone so that it focuses at the same point as the rest of the mirror. We can see from the above example that polishing the zone where the shorter radius zone transitions to the longer radius zone is the correct play.
Be cognizant of the moat effect: using too long of stroke or polishing over too broad of area, causing a moat to the polished surrounding the high zone. Studying the above results shows evidence of the moat effect occurring on the inside of the zone.
To fix a low zone, broadly polish an area wider than the zone, flattening out the kink in the bands that reveal the low zone. To fix a high zone, narrowly polish the area increasing the curvature of the zone, adding correction.
I discovered by accident after washing a mirror in warm water that the Ronchi test of a temporarily heated mirror makes minor zonal irregularities more obvious. There is a lot of shimmering but through it the zonal problems are exaggerated and easier to see. Allyn Thompson, in his 1947 book, 'How to Make a Telescope', describes how heating the glass exaggerates zonal irregularities. Also, it can help to move the Ronchi tester a great distance from the radius of curvature so that many bands cross the mirror's face. Zonal irregularities can be seen as discontinuities in the tightly spaced bands. The first example shows rough zones towards the edge; the second example shows smooth bands.
The fix is to use the largest sized laps possible with feathered, scalloped or stared edges with good blending technique. Varying strokes, adding a little side swing or 'W' motion helps as well as warmer shop temperatures or softer pitch.
Sometimes the time and uncertainty to fix a zone is worse than the time and certainty of returning to a sphere and re-parabolizing. Think an edge that badly turns on you. Or an accident happens. The time to re-parabolize is often much less because much of the time in the initial effort is learning how to parabolize given that particular mirror, focal ratio, pitch hardness, pitch thickness, polishing compound, strokes and so on. Consider one of the greatest opticians of all time, George Ritchey. To his horror when within a finishing session or two on the great 60 inch mirror for Mt Wilson observatory, he found the surface scratched. He traced it to contaminated polishing compound. He had taken 17 months to reach to point. He started again and finished the mirror in four months, in one-fourth the time.
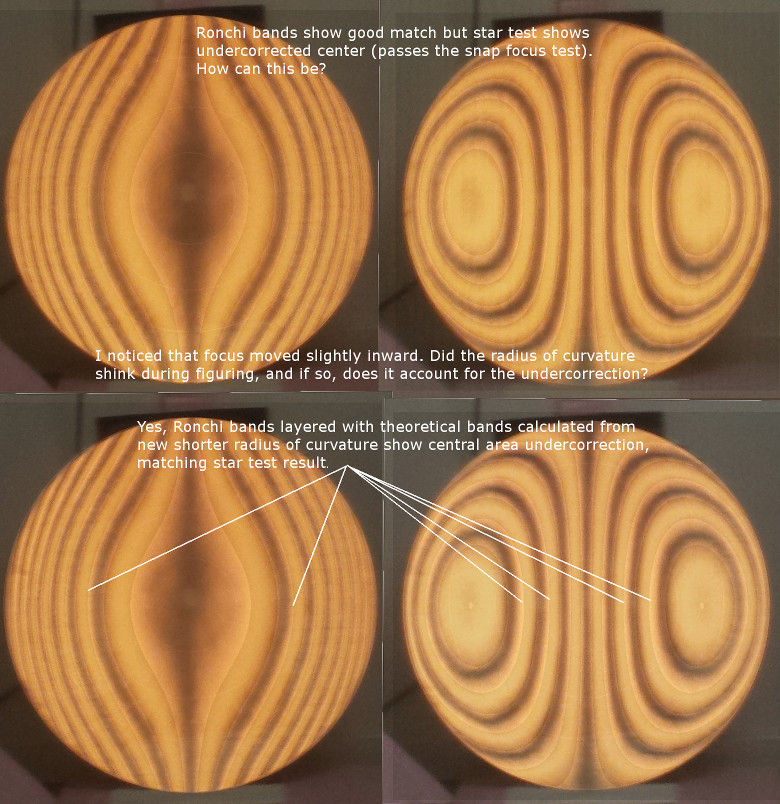
Determining the radius of curvature is important for accurate test results. Desired accuracy especially for faster or larger mirrors is 1/16 of an inch or 1mm. Radius of curvature is commonly measured from the mirror's central zone. Using a knife-edge test or a Ronchi test, place the knife edge or grating such that the mirror's center zone is nulled. Using a quality tape measure, supporting the tape so that it doesn't sag and measure from the mirror's center. Wrap the tape's end in masking tape so that it won't scratch the mirror. Also take the time to measure the mirror's clear diameter.
As the mirror's center is deepened during parabolizing, periodically re-measure the radius of curvature. I didn't re-measure often enough on a 25.1 inch [638cm] F2.62, only to find the mirror undercorrected in the star test when the Ronchi test showed good correction - a disappointment. A 0.3 inch [8 cm] shrinkage in the radius of curvature from 131.6 inches [3343cm] to 131.3 inches [3335cm] matters with this mirror. Luckily the mirror needed but a bit more parabolizing which was largely added during the subsequent work session. The mirror began figuring with a radius of curvature of 131.8 inches [3348cm], so the total shrinkage was 0.5 inches [13mm].
Two factors work against us when completing a mirror. The first is our psychology and the second is the difficulty in testing our mirror. We are goal centric beings. Once we set a goal, say of 1/4 wavefront or 1/10 wavefront, we become highly motivated to reach it. We optimistically interpret tests. Professional training is no inoculation – twice I’ve looked over the shoulders of professional opticians who were convinced that the mirror was good, blind to significant errors.
A good defense is twofold: first, I use more than one type of test, and secondly, I expect errors. Each type of test shows the mirror from a different perspective. It’s harder to skip over a potential iffy result when the error is revealed in different ways. For instance, there might be a tiny kink in the Ronchigram’s bands, the interferometer shows a little zone too, and the star test reveals some light is focusing short. The kink can be reasoned away, perhaps that interferometer report is a test stand problem and maybe the mirror wasn’t cooled sufficiently during the star test - but all three tests reporting the same issue?
All mirrors have defects. If I can find them then I know the resolution of my testing. Consider a mirror test that shows no errors. What is more likely: that the test isn’t sensitive or is the mirror truly perfect? Only twice in half a century have I been unable to see any defect in a mirror and I’ve tested many hundreds of mirrors, professional and amateur. So I test, test, test until the same errors consistently appear. When defects become a small fraction of the wavelength of visible light, testing like this takes considerable time and mental effort.
Fight psychology and testing difficulty by using at least two different types of tests until the same defects emerge. Once you reach “mirror reality” then you can decide whether the defects are significant and work must continue or whether the defect is immaterial for the telescope’s intended purpose.
I take a long term view, where I make each mirror to the best of my ability. This way I gradually improve my mirror making skills. As an amateur, it is just 'time' that I spend, not money (ignoring the lost opportunity cost). To the best of my ability means that I eventually reach a level where I fix one issue but another issue pops up, in a never ending treadmill. Though at a minimum each of my mirrors must pass the snap focus test and present at least a reasonably decent star test. Time to coat the mirror and enjoy the views.
An quite different perspective takes into account 'seeing', or the wavering of the atmosphere. To achieve 1 arc-second resolution, considered very good seeing, the mirror needs to be smooth and within:
| Diameter | Allowable_spherical_aberration |
|---|---|
| 6 inch | no wavefront error |
| 10 inch | 1/8th wavefront error |
| 20 inch | 1/3rd wavefront error |
| 30 inch | 1/2 wavefront error |
This means that smaller mirrors need to be exquisitely made; larger mirrors foremost should have what is called a smooth figure.
To resolve 1 arc-second, a magnification of 150x or higher is required.
My primary metric is the Milles-Lacroix criteria, which states that all the light rays should geometrically pass through the Airy Disk. Slope tests like Foucault and Ronchi along with the Hartmann test are ideal because these tests measure the slopes of the mirror's zones. We then straightforwardly compute where the light rays geometrically go. To be safe, I aim for a M-L value of 0.5, meaning that all the light rays pass through the middle half of the Airy Disk.
1 arc-second seeing suggests that a 30 inch mirror need only be made to a M-L value as great as 5 since a 30 inch mirror's resolution is theoretically 1/5th of an arc-second. However, a M-L value of 2 in a 30 inch F2.7 fails the snap-focus star test at high magnification during average seeing. The best way to explain this is that while the star light is smeared over a blur disk greater than the Airy resolution, so are the mirror defects that we see in the star test.
This raises the question of where we should center out errors: the center or the edge? Every discussion I have found states that we can slide the errors up or down to fit within the Milles-Lacroix envelope. The envelope expands as we consider the mirror's center zones, their slopes being more gentle and accepting a greater variance of angle so that the light rays pass through the Airy Disk. However, I have found that we should zero-out the edge zone, then accept what comes from inner zones. The reason lies with how we focus.
We focus using the disk of defocused starlight, shrinking it to the smallest dot possible. The edge of the disk of light, particularly when not that close to focus, corresponds to the edge of the mirror. The mirror's zones should be measured in relation to the focused edge then. And when the edge focus is compromised by out of compliance inner zones, then we can say that the mirror is unfinished and will focus poorly.
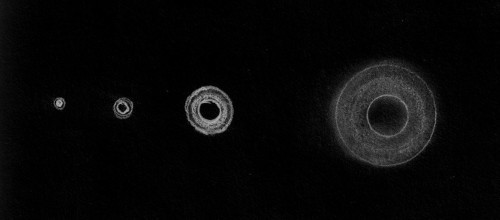
Here, the first two examples constitute a perfect mirror, then a good mirror. Note the wide focus depth. The third example shows the edge's focus is compromised by a high center - a poor unfinished mirror.

This behoves us to reconsider how to analyze Millies-Lacroix tolerances, suggesting that the M-L readings should be pinned to the edge zone's center, accepting that the other zones will fall as they fall because we focus the mirror's edge. On the left side we see the raw M-L slope measurements that are then adjusted for best fit. But the edge should actually be zeroed out per the right side graph.

Here is the corresponding star test, showing the high zone as we focus using the edge of the star disk.
After finishing the mirror, conduct a retrospective. Write down:
Improving isn't just about avoiding mistakes; it is also recognizing the good points and continuing on with them. Focus on reality, on the facts. Examine your approach and personality. Stay positive, stay motivated. Confusions are gaps in knowledge: seek out a mentor and conduct experiments.
Enjoy each level of expertise that you climb through: apprentice, craftsman, master. No matter how much you learn, you will discover more that you do not know, and what you thought you learned needs revising. Don't rush the end, it only retreats further away. The way to learn mirror making is to waste time making mirrors. Never hide in pride or arrogance; it only makes you more afraid and angry of truth. As mirrors slide through your hands into telescopes, you will come to love glass and it will reward you beyond words.
'I have looked further into space than any human being did before me.' - Sir William Herschel
'At the last dim horizon, we search among ghostly errors of observations for landmarks that are scarcely more substantial. The search will continue. The urge is older than history. It is not satisfied and it will not be oppressed.' - Edwin Hubble
'I was interested in telescopes and the way they worked because I had an intense desire to see what things looked like, so I learned how to use telescopes and find things in the sky.' - Clyde Tombaugh
'For my confirmation, I didn't get a watch and my first pair of long pants, like most Lutheran boys. I got a telescope. My mother thought it would make the best gift.' - Wernher von Braun
Do not forget to savor nights under the stars with your wonderful mirror that you made with your own hands and brain. Just think of it, using simple testers and humanity's marvelous invention, glass, you can make the invisible and unfathomably distant Universe visible by shaping to astonishing accuracy the telescope mirror.
For more see