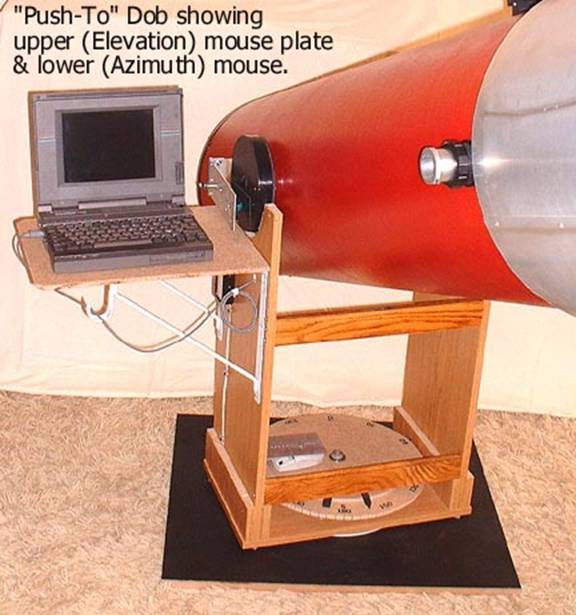
DOB UPGRADE to a DSO "PUSH-TO"
-Overview-
Unless
skilled at Star hopping, finding DSO's can be rather hard with a basic Dob platform.
Using
a modified
mouse on each of the Azimuth & Elevation axis, both can be coordinated
together to indicate actual pointing of
your Dob in an Astronomy program such as Skyglobe. (photo 1)
-Preliminary Investigation-
Using
an astronomy program like Skyglobe the normal mouse
cursor finds a Star or DSO and identifies it besides giving the RA., DEC.,
Azimuth & Elevation of that object. This triggered an idea about a year ago
to try and modify a basic dob
platform to make the dobs actual pointing coincide
with the cursor in Skyglobe without any significant
expense.
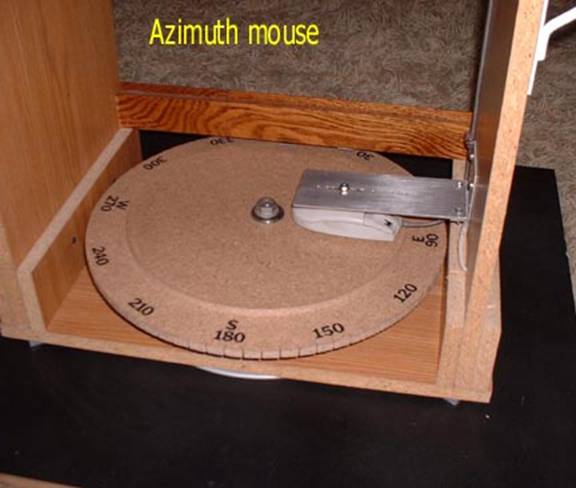
Using a
standard mouse on a wood Azimuth wheel marked in degrees (to compare with during
the trial developement), a mouse was connected to a
laptop computer running Skyglobe. A wood degree wheel
was constructed as best I could, and made moveable(friction set by hardware tightening & washers),
to allow compensation for any compass direction the base platform happens to be
generally pointed at. On top of the degree wheel is a second smaller wheel which
will allow fine tuning a mouse at any time to correct for pointing errors in the
Dobs azimuth from any errors in my degree wheel
construction accuracy. It also, is friction tightened enough to not move easily.
When rotating the upper dob
platform during an Azimuth change, the only thing moving is the upper dob and a pointer for the degree wheel. A standard mouse(unmodified yet) is mounted to ride on top of the fine
tuning wheel. (photo 2 )
The
fine tuning or correction wheel, is simply rotated CW
or CCW by fingers. The lower degree wheel is rotated by two hands. Two different
levels of friction for the two wheels are so that neither will turn during
normal operation. The preliminary test
showed the programs cursor follows (roughly) the aiming of the telescope in
azimuth and was fairly repeatable, but dob slop in azimuth movement introduced errors.
-Construction-
In order for something to work like this, all
play or loosness must be eliminated in the dobs azimuth mounting. A key item here is the central pivot
bolt. The central bolt for the dob was made rigid,
going thru steel sleeves imbedded into the upper and lower dob platforms, and honed to fit the central bolt
snug. Final accuracy of dob is dependant on the
continued rigidity of this bolt and the accuracy of the reference degree
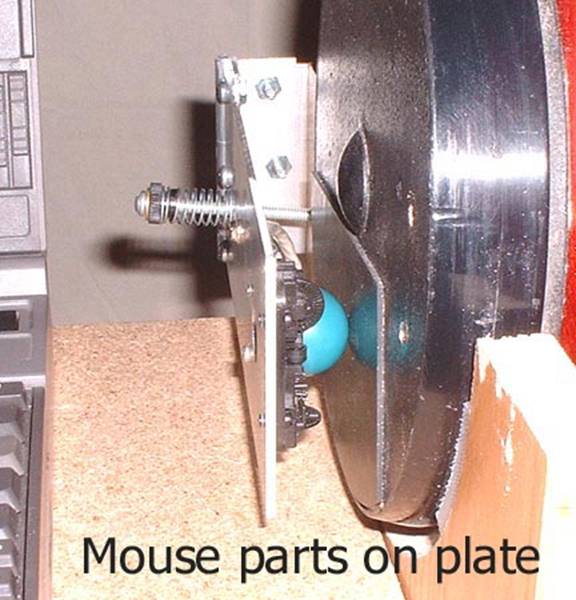
wheel.. An aluminium plate
was fashioned to hold the recessed hex head bolt from turning on the underside
of the dob base. (photo 3
)
Depending on the bearing type you are using, ( I used a 12" Lazy Susan bearing, and also
teflon on another dob), you
may need to file or grind precision skids of teflon or
cutting board plastic at the corners of the dob to
eliminate any "rocking", this improves stability in the system.
-Initial Performance Check &
Setting-
The
dob is pointed East(for
example), and the computer program is started. Skyglobe automatically sets the mouse cursor centered in
Azimuth, mid screen. (The program allows saving in any direction). The program has an Azimuth scale in degrees
along with 15 degree markings in Elevation. The mouse cursor also can be read
out in RA., DEC., Azi., & Elev., for
its current position in the lower left corner of Skyglobe. In the program set the HORIZON to match the
starting position of the screen cursor in screen center and "save" it to make
the initial adjustments easier when you want to work on the dob.
My
purpose at this point is to see how far off I am when I move the dob 10 degrees in either direction(doesn't matter),
in Azimuth with a mounted "basic" mouse runnng on the
upper disk , using the degree wheel pointer for the 10 degree shift, and noting
how far the Skyglobe cursor moves for that 10 degee change horizontally in Azimuth.
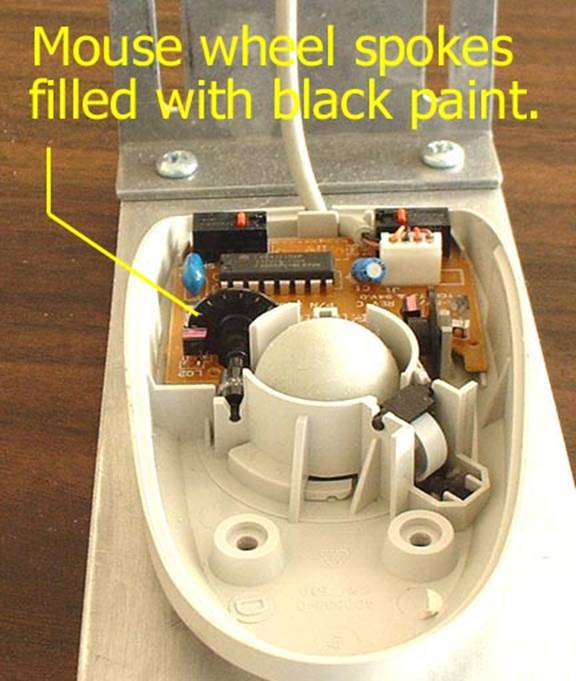
The
standard (unmodified mouse) is turning an internal wheel with many(50 or so) spokes across a light beam sensor when it is
in motion. Different brands and models of mice have different numbers of spokes
in their wheels. In my case, with a
generic mouse, the Skyglobe cursor moved more than 30
degrees in Azimuth. This means too many many spokes
(too many tic's) by three times. Dis-assembling the mouse was required to fill in with black
paint (with needle) some of the spokes. This must be done evenly around the
spoked wheel. In my case every 2nd AND 3rd spoke was
filled in with black paint. A second test of a 10 degree change on the degree
wheel when rotating the dob shows it is fairly
accurate now, and continues to be going up to 45 degrees either side of computer
screen center for a screen width travel of 90 degrees.
(photo 4)
Adjustment of dobs angular degree accuracy (the
degree wheel) to the computer screem cursor accuracy
in azimuth is done by "where" the mouse ball rides on the upper wooden circular
platform in respect to the axis. If the mouse is to far
out from the center, it will cause too much deflection in the program, if too
close to the center it will not deflect enough. This is a very fine adjustment
and must be done carefully while re-checking both degree wheel pointing and
computer cursor displacement for that change. It is at THIS point I used the zoom feature of
the program to obtain the observation window I wanted, both in azimuth and in
elevation, and saved the program to that configuration. All of the adjustments
for ths dob are for ONE
COMPUTER ONLY!. If you change computers, screen size
and resolution will require re-doing the entire calibration over for the new
computer. Final adjustment of the azimuth mouse is done at 45 degrees of
elevation in the program, makng it most accurate when
the screen centered cursor is midway up the sky at that particular zoom. This final positioning of the azimuth mouse is done with a pre-slotted
plate or holes (slotted preferred). Also prior to this, a nut with bolt and
washers is exactly centered in the mouse shell top by drilling, with enough bolt
threads poking thru to allow mtg. to the adjusting plate surface after the
calibration of the mouse position is finished.
When
finished and all mouse mtg. hardware is tightened, you COULD stop here!. It was handy to find DSO's after setting the azimuth to
line up in Skyglobe on a DSO and then just moving the
scope up in Elevation with a common degree dial/pointer assy. This only requires
a very small back 'n forth motion to pinpoint the DSO at the correct elevation
and my error was less than a degree in most cases. It is easy to find DSO's this
way with a wide angle low power eyepiece.
-Second Generation Model-
However, after using it this way for about a year, I decided to approach
the Elevation aiming of the dob using the same basic idea. For this I started on a
second (and better) 13" dob
base from scratch. I wanted to use the
dobs upper bearing surface for a mouse pad to avoid
making disks. This will require using a
TrackBall mouse, and making a spring loaded plate with the guts of a trackball
mouse installed on it, or a whole mouse mounted on the plate. I used the guts of
a mouse. (Photo 5)
With a
repeat of the original azimuth idea redone on the new dob platform.
Having
a limited source of mice on hand, (I did not have two identicle trackballs), I chose to use the guts of an old
burned-up Tandy trackball mouse for the Elevation. It would have been simpler to
use a whole mouse but the old Tandy was too ugly!.
Painting of the spokes was not necessary because the Tandy mouse had far
fewer spokes. A normal mouse for Elevation will require filling the spokes to
calibrate as explained before using the 15 degree marks in Skyglobe and a machinists level for
0 degrees, 45 degrees, and 90 degrees, at the current and final zoom mode that
was saved. The spoke filling proceedure will be the
same for most mice types. Final calibration is the same, sliding the mouse
mounting plate up or down on the dob platform. to different
points of contact on the bearing radiius. Note: -Optical mice probably cannot be
modified this way for tic calibration.
Now you
have two mice and two connectors..... You must join the two into one connector.
I chose to cut the traces on the Azimuth mouse verticle circuit and join the Elevation mouses verticle traces to it with
wire (or 5 wire cable), after cutting the traces free from the original Tandy
circuit. Different mice have different circuits too, so I cannot describe how
that was done specifically. But it can
be done by any technician after he has made certain which traces are to be cut on both
mice. Two identicle mice are a lot simpler. Mine were not identicle. At any
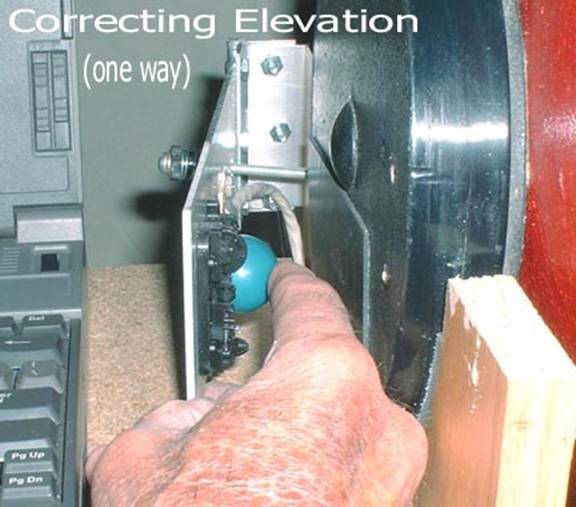
point, you can adjust the Elevation mouse simply by moving the ball with
fingertips under the sprng loaded plate if you need to
gain greater accuracy in really high Elevation settings. (Photo 6
)
Skyglobe can present its astronomy program in 90 degree wide
azimuth quadrants. You can vary the programs view direction with keyboard
pointers but YOU MUST bring the scope back to horizontal either with a bubble
level or a marker of some kind showing telescope level in any NEW direction of N., E., S., or W., (or anything else) because
remember... Skyglobe always brings the cursor mid
screen on program startup and you will have to reset your Skyglobe verticle cursor with fingers
turning the vertcle mouse ball after leveling the
telescope so that it lines up with the horizon shown in the program in order to
keep verticle accuracy. This is in effect
recalibrating the verticle for the new azimuth change.
Of course when changing the compass pointing of the telecope, you will need to also change the programs compass
direction to match. All of this sounds hard and complicated.... It's NOT!. it only takes seconds!.
This compass direction change can be done by
restarting the program after setting scope horizontal in the new quadrant drection and using the arrow keys or keyboard keys (N,S,E, or W) to center the program at this new direction. I
prefer using one of the 4 compass points myself. The azimuth degree wheel will
not need changing unless it was not previously accurately set. The azimuth mouse
wheel is then adjusted to match the new change in degree on the computer screen
if the dob angle is not dead
on. The adjustable degree wheel pointer comes into play here for large
direction/quadrant changes in Azimuth if it's already has been set at a compass
point earliier and you have not moved the dob base. NOTE: -Anytime you run the cursor to the edge of
the programs screen, it will require resetting the scope because the horizontal
and verticle accuracy is altered when the mouse stops
moving from the program limit, but the dob continues to move beyond the screen limit. Avoid
doing that.
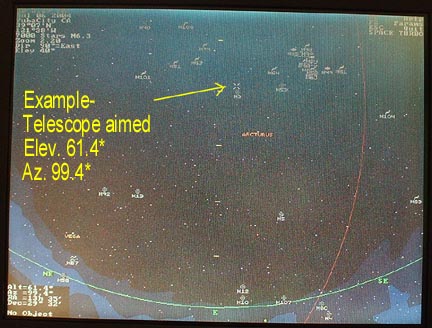
There
are shortcuts available.... Program familiarity allows many shortcuts that save
time and effort. (Photo
screen)
I
will apologize for what is difficult to describe, but is intuitively OBVIOUS
after you have done the first Azimuth wheel calibration. The rest of the
calibration in the verticle is only a repeat of the
method used in the horizontal mouse. It is drop-dead simple in reality except
for the circuit merging. More advanced modern computers allow the use of two
mice simultaneous, this means you only
need to wrap black tape around ONE SENSOR IN EACH MOUSE to disable that part
which you do not need, be it the horizontal or verticle wheel.
BEST OF
ALL -AT ANY
TIME, you can aim at a known star,
adjust the programs direction, adjust the mouse lower wheel & upper
ball to coincide on that star on the
programs screen and you are automatically calibrated for that whole 90 degree
quadrant of DSO's shown on the computer screen. You need not fool with the
degree wheel or anything else.
Realizing this is a working outline and subject to improvement in every
way, it is
offered only to open up new possibilities in Dobs,
Portaballs & Guidance Systems. It is hoped others
will continue to develope this concept and hopefully
better integrate it with more popular astronomy programs.